


Chapter 5: Creating and Building Projects 121
If you select the Resources option, you can include a Win32 resources file, which
you can then access through code in your application. This is another advanced scenario
beyond the scope of this book.
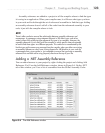
Assembly Information
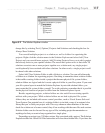
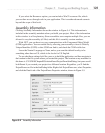
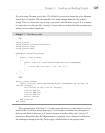
Clicking Assembly Information shows the window in Figure 5-4. This information is
included in the assembly metadata when you build your project. Most of the information
in this window is self-explanatory. Since assemblies can comprise multiple files, you are
allowed to vary the assembly (all files) and this file’s assembly version numbers.
With .NET, you can have two-way communications with Component Object Model
(COM) applications. You can enable this by allowing your assembly to have a Globally
Unique Identifier (GUID) so that COM can find it, and check the COM visible box.
Leave the Neutral Language as None, unless you want the default locality to be
something other than en-US, which is the locale for US English.
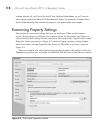
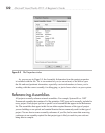
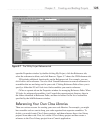
To see what these settings look like, press
F6 to build the application, and then navigate to
the location in the file system where you created the project. The location on my machine for
this demo is C:\VS2010\Chapter05\SolutionDemo\ProjectDemo\bin\Debug, but yours could
be different if you created your project in a different location. Regardless, you’ll find the
ProjectDemo.exe file in the bin\Debug folder. Right-click ProjectDemo.exe, select Properties,
and click the Details tab of the ProjectDemo Properties window, shown in Figure 5-5.
Figure 5-4 Assembly Information