


202 Microsoft Visual Studio 2010: A Beginner’s Guide
The default zoom level for the Designer is 100%, but you can change this by right-
clicking, select Zoom, and select a zoom level percent. This might be useful if you wanted
a higher-level view where you could fit more objects onto the screen at one time.
If you right-click and select Layout Diagram, VS will automatically lay out your
diagram so that classes with relationships can physically reside in the same area with
minimal overlapping of association lines, a feature I call auto-layout. After you’ve
performed auto-layout, you will be able to manually change the location of classes by
selecting and dragging each class to a new location, a feature I call manual layout.
TIP
Be careful of executing auto-layout after you have your layout the way you want. I tend
to perform an auto-layout after the first time working with the LINQ to SQL Designer
on a database. Then I follow up with manual layout to make working with classes even
easier. Using auto-layout after manual layout will result in a lot of lost work.
It’s common in development to add new tables to a database that you also want in
the Designer. In that case, drag and drop the tables from Server Explorer as you did for
Customer and Order earlier. If a table changes, you can select its corresponding class in
the Designer and delete that class and then drag and drop the new table onto the design
surface. Any foreign key references will result in associations on the Designer if classes
for both tables reside in the Designer too.
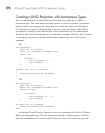
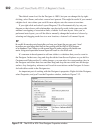
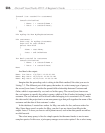
An important part of working with the Designer is properties. Right-click the Designer,
select Properties, and you’ll see the Properties window, similar to Figure 7-12.
Figure 7-12 The LINQ to SQL Class Designer Properties window