


398 Microsoft Visual Studio 2010: A Beginner’s Guide
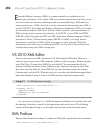
In addition to the *.AddIn file, you’ll need to determine where the Add-In class library
file (*.dll) will reside. By default, the Add-In Project Wizard assumes that the *.dll file is
deployed in the same location as the *.AddIn file. Listing 13-5 shows the contents of the
*.AddIn file. The location of the *.dll file is specified in the Assembly element, which can
be either a file system path or a URL.
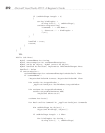
Listing 13-5 Contents of the *.AddIn file
<?xml version="1.0" encoding="UTF-16" standalone="no"?>
<Extensibility xmlns=
"http://schemas.microsoft.com/AutomationExtensibility">
<HostApplication>
<Name>Microsoft Visual Studio</Name>
<Version>10.0</Version>
</HostApplication>
<Addin>
<FriendlyName>Keystroke Finder</FriendlyName>
<Description>
Displays a List of VS Shortcut Keystrokes.
</Description>
<AboutBoxDetails>
Creating an Add-...
</AboutBoxDetails>
<AboutIconData>...</AboutIconData>
<Assembly>KeystrokeFinder.dll</Assembly>
<FullClassName>
KeystrokeFinder.Connect
</FullClassName>
<LoadBehavior>1</LoadBehavior>
<CommandPreload>1</CommandPreload>
<CommandLineSafe>0</CommandLineSafe>
</Addin>
</Extensibility>
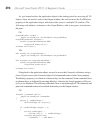
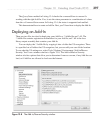
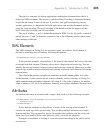
Another way to work with Add-Ins is via the Add-In Manager, which you can open
by selecting Tools | Add-in Manager. Figure 13-9 shows the Add-In Manager with the
KeystrokeFinder Add-In in the list. Checking Available Add-Ins immediately loads or
unloads the Add-In, checking Startup indicates whether the Add-In will load when VS
starts, and checking Command Line makes the Add-In load if a user runs VS (devenv.exe)
via the command line.