


Chapter 1: Introducing Visual Studio 2010 15
The Tools menu contains a grab-bag of functionality; for instance, you can attach a
debugger to see your other programs run, line by line; connect to a database for data; set
add-ins, macros, and more. One very important menu item on the Tools menu is Options,
which exposes hundreds of settings for customizing your VS environment.
You can use the Test menu to find all of the functionality for performing unit tests to
test your new software one part at a time. This is also where other editions of VS include
access to other types of testing tools.
The Analyze, Architecture, and Team menus have advanced functionality for improving
the performance of an application, working with application architecture, and integrating
with Microsoft’s Team Foundation Server.
The Windows and Help menus are similar to most other application types, where the
Windows menu allows you to manipulate the VS windows and the Help menu is where
you visit to find the technical documentation on VS.
TIP
Many menu items contain shortcut keys that perform the same action as selecting the
menu item. If you are curious about what shortcut keys are associated with a particular
action, you can often find them by opening the menu to see if there are shortcuts
associated with that action. For example, to open the Solution Explorer window and
visit the View menu, the shortcut keys are
CTRL-W, S.
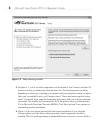
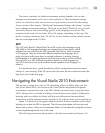
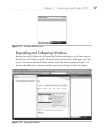
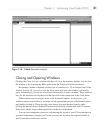
Toolbar
Beneath the menu in Figure 1-10, you’ll find a toolbar. The toolbar contains frequently
accessed functionality that is a subset of what is available via menus. The toolbars are
context-sensitive, showing and hiding depending on what you are doing in VS.
You can
display any toolbar by selecting View | Toolbars.
You can also customize toolbars by right-clicking the toolbar of your choice, scrolling
to the bottom of the list, and selecting Customize. The toolbar customization window
allows you to add any feature you would like to the current toolbar.
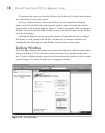
Work Area
In the center of Figure 1-10, you can see the Start page. This is the same area that you’ll
use to write code and work with visual designers. The Start page is divided into two
sections: project management and information. The project management side of the page,
on the left, offers a quick way to start new projects or work with a list of recently opened
projects. The information side of the page, on the right, contains resources to help you get
started with VS, such as links to the Microsoft Web site, walkthroughs to help you learn
new features, and a tab that updates with the latest developer news from Microsoft.