


Chapter 3 Removal and Replacement Procedures
3-119
1. Removal and Replacement Procedures
Parts removal and replacement procedures are described in major 12 items which correspond to
classification of parts list.
✻
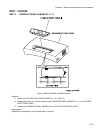
RRP 1 COVERS
✻
RRP 2 PAPER CASSETTE
✻
RRP 3 PAPER FEEDER
✻
RRP 4 HOUSING ASSY RETARD
✻
RRP 5 FRONT ASSY IN
✻
RRP 6 CHUTE ASSY OUT
✻
RRP 7 CHUTE ASSY EXIT
✻
RRP 8 BTR ASSY & FUSER
✻
RRP 9 XEROGRAPHICS
✻
RRP 10 TCRU ASSY
✻
RRP 11 FRAME & DRIVE
✻
RRP 12 ELECTRICAL
Parts are controlled as spare parts. When servicing for parts for which no procedures
are described, observe their assembling condition before starting the service.
For optional parts, refer to the manual for them.
Though the optional parts are assumed to be removed, they may not be removed if not
required for the purpose of service operation.
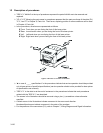
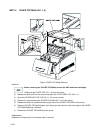
1.1 Before starting service work
◆ Turn the power OFF and remove the power cord from the electric outlet.
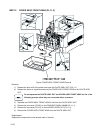
◆ Remove the PHD ASSY (PL9.1.3) before starting the disassembling process.
◆ Remove the TCRU ASSY as necessary, and perform disassembly process.
◆ When performing service operation for parts around the FUSER ASSY, start the service after the
FUSER ASSY and parts around it have cooled down.
◆ Do not give forcible power to prevent damage of parts or functions.
◆ Since a wide variety of screws are used, be careful not to mistake their positions, to prevent crushing of
the screw holes or other troubles.
◆ Wear a wrist band or the like as far as possible to remove static electricity of the human body.