


Diagnostic aids 3-5
3. Use or to select the margin setting you need to change, and press .
The Top margin sign/value pair blinks. This indicates it is the margin value being changed.
4. Use to decrease or to increase the offset values, and press to confirm the value.
The message Submitting selection displays, and the original REGISTRATION screen appears with
the beside the previously selected margin setting.
The print registration range is:
5. Continue changing the settings by repeating steps 2 through 4.
6. Print another copy of the Quick Test to verify your changes.
7. To exit REGISTRATION, press Back ( ).
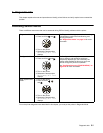
Quick Test
The Quick Test contains the following information:
• Print registration settings
• Alignment diamonds at the top and bottom
• Horizontal lines to check for skew
• General printer information, including current page count, installed memory, serial number, and code level.
To print the Quick Test page:
Note: Print the Quick Test Page on letter or A4 paper.
1. Select REGISTRATION from DIAGNOSTICS.
2. Press until the appears next to Quick Test.
The message Quick Test Printing… appears on the display.
Once the Quick Test Page completes printing, the Registration screen displays again.
T=xxx* B=xxx*
L=xxx* R=xxx*
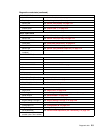
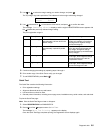
Variable Description Value Direction of change
B= Bottom margin -20 to +20 Each increment causes
approximately 0.55 mm shift in the
bottom margin.
A positive change compresses the
image so it appears to move down
the page and a negative change
moves the image up.
T= Top margin -25 to +25 Each increment causes
approximately 4 pels shift (at 600
dpi).
A positive change moves the image
down the page and increases the
top margin. A negative change
moves the image up and decreases
the top margin.
L= Left margin -25 to +25 A positive change moves the image
to the right, and a negative change
moves the image to the left. No
compression occurs.
R= Right margin -10 to +10 A positive change moves the image
to the right, and a negative change
moves the image to the left.