


Section 4 Novell NetWare Network Configuration
PocketPro 100S Administrator’s Guide -- Document #40165-110 Rev. A 4-67
Configuring the
Print Server and
Print Queue
Using NWAdmin,
WebXAdmin, or
JetAdmin (cont.)
Configuring the
Print Server and
Print Queue
Using
PCONSOLE and
XCONFIG
(Remote Printer
Mode)
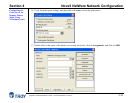
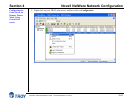
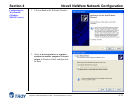
13. Select the print server and service that you wish to configure:
If you are using WebXAdmin, start your web browser, enter the IP address of the print server as the
destination address, and then push ENTER or RETURN. Click on Configure NetWare, and then click
on the Enabled Service to configure the print server (the default service names are listed in the Default
Print Server Names section at the beginning of this chapter).
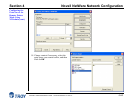
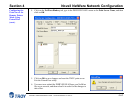
If you are using JetAdmin, one TROY print server NetWare service will show up in the list of printers
(the default service name is listed in the Default Print Server Names section at the beginning of this
chapter; note that JetAdmin supports a maximum of three ports per print server). Click on the service to
configure, go to the menu bar and select Device, and then select Modify. Click on Next, and then select
Operating Mode.
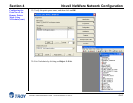
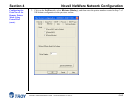
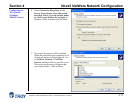
14. Select the Remote Printer as the Operating Mode, enter the name of your PSERVER NLM as the Print
Server Name, and select the number of the printer from step 6 as the Printer Number (XAdmin32 and
JetAdmin allow you to choose from a list of available print server NLMs rather than typing in the name).
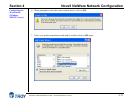
15. If you have JetAdmin, click Next two times, and click on Finish. If you have WebXAdmin, click Submit.
16. Exit the configuration utility. You must now unload the PSERVER NLM from your NetWare file server
console and then reload it in order for the changes to take effect.
To configure the TROY PocketPro 100S for remote printer mode operation using PCONSOLE and XCONFIG,
perform the following steps:
1. Make sure that the PSERVER NLM (NetWare Loadable Module) is loaded on your file server.
2. Log into the file server from your PC workstation as ADMIN if you are using NetWare 4.xx (if you want
NDS support, do not login under bindery mode). If using NetWare 2.XX or 3.xx, login as SUPERVISOR.
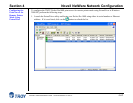
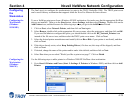
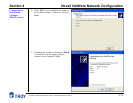
3. Run the PCONSOLE utility from your PC workstation.
4. If you are creating a new print queue, select Print Queue Information (NetWare 3.xx) or Print Queues
(NetWare 4.xx) from the Available Options menu. Press INSERT, type in the desired print queue name
(with NetWare 4.xx, you will also be asked for a volume name; press INSERT and select the appropriate
volume), and press ESCAPE to return to the main menu.