


Section 4 Novell NetWare Network Configuration
PocketPro 100S Administrator’s Guide -- Document #40165-110 Rev. A 4-43
Configuring the
Print Server and
Print Queue with
the Novell
Gateway
To configure the TROY PocketPro 100S with the Novell gateway, you must first install the NDPS on the client
workstation (use any NetWare client 2.2 or later CD-ROM and specify "Custom installation"). Then install the
NDPS Broker and create an NDPS Manager (use the NetWare Administrator "Create" command and select the
appropriate NDPS object).
Next you must create an NDPS Printer object (which emulates a Print Server NLM), and you must also configure
the print server as a remote printer (NPRINTER) that is connected to this Printer Object. The print server can be
configured using WebXAdmin or print server console (specify the Printer Object as the name of the Print Server
NLM, and select any desired printer number for the TROY print server). Create the NDPS Printer as follows:
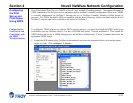
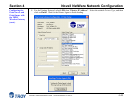
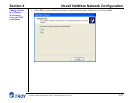
1. In the NetWare Administrator (NWAdmin), select the container where you want to put the printer object.
2. You will get the Object menu. Select Create to get the New Object dialog.
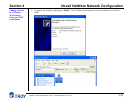
3. Select NDPS Printer.
4. Type in any name for the NDPS Printer.
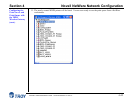
5. Select Create a New Printer Agent to create a new printer that uses the Novell gateway and click Create.
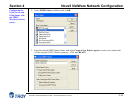
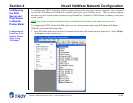
6. Make sure that he Printer Agent name is correct, and then click on Browse to select the NDPS manager.
7. Select the Novell Printer Gateway as the Gateway Type.
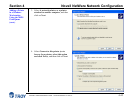
8. Configure the Connection type as "Remote" and specify the Port type as Other.
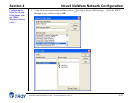
9. In the PServer Emulation box, use the default SAP name (which should be the same as the name of the
Printer Agent) and specify the printer number (this number must match the one that you configured in the
TROY print server). Click "Next".
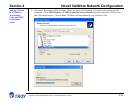
10. Click Finish to get the Select Printer Drivers dialog.
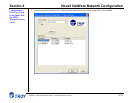
11. Select the printer driver for each operating system (Win3.1, Win9X, Windows 2000/XP, or Windows NT4.0).
12. Click Continue to finish this process.
You can then use the standard Windows 9X Add Printer utility to add the printer on any client workstation.
Specify a Network Printer and then use then browse to find the Printer Agent that you just created. The driver
will be automatically downloaded and you will be ready to print.