


Section 4 Novell NetWare Network Configuration
PocketPro 100S Administrator’s Guide -- Document #40165-110 Rev. A 4-20
Configuring the
Print Server
Using HP
JetAdmin 3.XX
1. Make sure that JetAdmin 3.xx is running on your system and that you have sufficient privileges to use it to
create print queues. If you are using the Microsoft NetWare client on your workstation, make sure that you
have installed Services for NetWare Directory Services in the Network control panel.
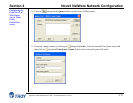
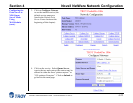
2. Click on Start, select Programs, select the HP JetAdmin Utilities 3.0 folder, and then select HP JetAdmin.
One or more TROY print server NetWare services will show up in the list of printers (the default service
names are listed in the Default Print Server Names section at the beginning of this chapter).
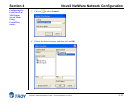
3. Click on the NetWare service you wish to configure, and then go the menu bar and select File, Modify.
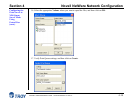
4. If desired, change the print server name and description. Click on Next. Do this with caution because this
will change the print server service name, and will, therefore, affect any other protocols that use this service.
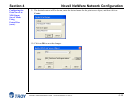
5. Make sure that NetWare Directory Services is selected in the window on the left side of the display.
Click on the inverted triangle button and select the NDS tree.
Click Change... button to select the NDS context.
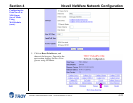
6. Click on the Operating Mode button and select Queue Server Mode.
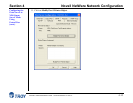
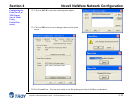
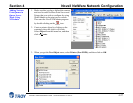
7. Click on the Queues button, and click on the Change... button. Select the Available Print Queues window:
If you are configuring an NDS queue, click on the context where the print queue will reside.
If you are configuring a bindery queue, click on the volume where the queue will reside.
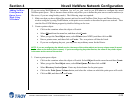
8. Click on Create and enter any unique name for the Queue name.
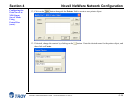
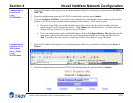
If you are configuring an NDS queue, the default file server on which the print queue will reside will
be listed. You may optionally change this by clicking on the inverted triangle button and selecting a
different server. You may also optionally change the context that you selected in the previous step by
clicking on the Browse... button. Click on OK, and proceed to Step 9.
If you are configuring a bindery queue, you may optionally click on the inverted triangle button to
change the file server volume selected in the previous step. Click on OK to continue and go to Step 9.
9. Click on Yes when asked if you want to add the queue to the list of serviced queues. The queue name will
now appear in the Available Print Queues in the selected context (for NDS mode) or under the selected
volume (for bindery mode).
10. Click on OK, and then click on Next. If applicable, enter the IP address, and then click on Next.
11. If desired, you can enable users that will be notified in the event of printer problems. Click on Finish. You
can now use the print queue from your NetWare workstation.