


70-11
Cisco ASA 5500 Series Configuration Guide using ASDM
Chapter 70 Configuring Dynamic Access Policies
Configuring Dynamic Access Policies
Detailed Steps
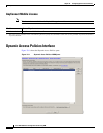
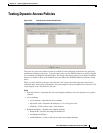
Step 1 Start ASDM and select Configuration > Remote Access VPN > Network (Client) Access or Clientless
SSL VPN Access > Dynamic Access Policies.
The Configure Dynamic Access Policies pane opens.
Step 2 To include certain antivirus, antispyware, or personal firewall endpoint attributes, click the CSD
configuration link near the top of the pane. Then enable Cisco Secure Desktop and Host Scan extensions.
This link does not display if you have previously enabled both of these features.
If you enable Cisco Secure Desktop, but do not enable Host Scan extensions, when you apply your
changes ASDM includes a link to enable Host Scan configuration.
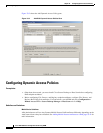
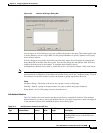
Step 3 To create a new dynamic access policy, click Add. To modify an existing policy, click Edit.
The Add/Edit Dynamic Access Policy pane opens.
Step 4 At the top of the Add/Edit Dynamic Access Policy pane, provide a name (required) and a description
(optional) of this dynamic access policy.
• The Policy Name is a string of 4 through 32 characters, no spaces allowed.
• You are allowed a maximum of 80 charaters in the DAP Description field.
Step 5 In the ACL Priority field, set a priority for the dynamic access policy.
The security appliance applies access policies in the order you set here, highest number having the
highest priority. Values of 0 to 2147483647 are valid. The default value is 0.
Step 6 In the Add/Edit AAA Attributes field, use the ANY/ALL/NONE drop-down list (unlabeled) to choose
whether a user must have any, all, or none of the AAA attribute values you configure to use this dynamic
access policy, as well as satisfying every endpoint attribute.
Duplicate entries are not allowed. If you configure a DAP record with no AAA or endpoint attributes,
the ASA always selects it since all selection criteria are satisfied.
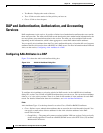
Step 7 To Set AAA attributes, click Add or Edit in the AAA Attributes field. Use one or more of these
procedures: See the “Configuring AAA Attributes in a DAP” section on page 70-14 for more
information.
Step 8 Use one or more of these procedures to add or edit endpoint attributes to the DAP policy:
• Adding an Anti-Spyware or Anti-Virus Endpoint Attribute to a DAP, page 70-19
• Adding an Application Attribute to a DAP, page 70-20
• Adding Mobile Posture Attributes to a DAP, page 70-21
• Adding a File Endpoint Attribute to a DAP, page 70-22
• Adding a Device Endpoint Attribute to a DAP, page 70-23
• Adding a NAC Endpoint Attribute to a DAP, page 70-24
• Adding an Operating System Endpoint Attribute to a DAP, page 70-25
• Adding a Personal Firewall Endpoint Attribute to a DAP, page 70-26
• Adding a Policy Endpoint Attribute to a DAP, page 70-26
• Adding a Process Endpoint Attribute to a DAP, page 70-27
• Adding a Registry Endpoint Attribute to a DAP, page 70-28