


14-13
Cisco ASA 5500 Series Configuration Guide using ASDM
Chapter 14 Completing Interface Configuration (Routed Mode)
Completing Interface Configuration in Routed Mode
The ASA supports IP path MTU discovery (as defined in RFC 1191), which allows a host to dynamically
discover and cope with the differences in the maximum allowable MTU size of the various links along
the path. Sometimes, the ASA cannot forward a datagram because the packet is larger than the MTU that
you set for the interface, but the “don't fragment” (DF) bit is set. The network software sends a message
to the sending host, alerting it to the problem. The host has to fragment packets for the destination so
that they fit the smallest packet size of all the links along the path.
The default MTU is 1500 bytes in a block for Ethernet interfaces. This value is sufficient for most
applications, but you can pick a lower number if network conditions require it.
To enable jumbo frames, see the “Enabling Jumbo Frame Support (Supported Models)” section on
page 12-38. A jumbo frame is an Ethernet packet larger than the standard maximum of 1518 bytes
(including Layer 2 header and FCS), up to 9216 bytes. Jumbo frames require extra memory to process,
and assigning more memory for jumbo frames might limit the maximum use of other features, such as
access lists. To use jumbo frames, set the value higher, for example, to 9000 bytes.
Prerequisites
• Set up your interfaces depending on your model:
–
ASA 5510 and higher—Chapter 12, “Starting Interface Configuration
(ASA 5510 and Higher).”
–
ASA 5505—Chapter 13, “Starting Interface Configuration (ASA 5505).”
• In multiple context mode, you can only configure context interfaces that you already assigned to the
context in the system configuration according to the “Configuring Multiple Contexts” section on
page 11-14.
• In multiple context mode, complete this procedure in the context execution space. To change from
the system to a context configuration, in the Configuration > Device List pane, double-click the
context name under the active device IP address.
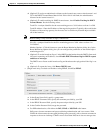
Detailed Steps
Step 1 Choose the Configuration > Device Setup > Interfaces pane.
For the ASA 5505, the Interfaces tab shows by default.
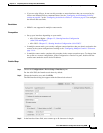
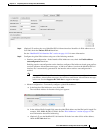
Step 2 Choose the interface row, and click Edit.
The Edit Interface dialog box appears with the General tab selected.
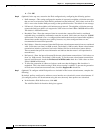
Step 3 Click the Advanced tab.