


81-9
Cisco ASA 5500 Series Configuration Guide using ASDM
Chapter 81 Troubleshooting
Other Troubleshooting Tools
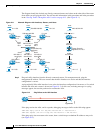
Step 9 Click Next to display the Egress Traffic Selector screen. For more information, see the “Egress Traffic
Selector” section on page 81-10.
Step 10 Choose the egress interface from the drop-down list.
Step 11 Enter the source host IP address and choose the network IP address from the drop-down list.
Step 12 Enter the destination host IP address and choose the network IP address from the drop-down list.
Note The source port services, destination port services, and ICMP type are read-only and are based
on the choices that you made in the Ingress Traffic Selector screen.
Step 13 Click Next to display the Buffers & Captures screen. For more information, see the “Buffers” section on
page 81-10.
Step 14 In the Capture Parameters area, to obtain the latest capture every 10 seconds automatically, check the
Get capture every 10 seconds check box. By default, this capture uses the circular buffer.
Step 15 In the Buffer Parameters area, you specify the buffer size and packet size. The buffer size is the
maximum amount of memory that the capture can use to store packets. The packet size is the longest
packet that the capture can hold. We recommend that you use the longest packet size to capture as much
information as possible.
a. Enter the packet size. The valid size ranges from 14 - 1522 bytes.
b. Enter the buffer size. The valid size ranges from 1534 - 33554432 bytes.
c. Check the Use circular buffer check box to store captured packets.
Note When you choose this setting, if all the buffer storage is used, the capture starts overwriting the
oldest packets.
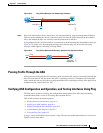
Step 16 Click Next to display the Summary screen, which shows the traffic selectors and buffer parameters that
you have entered. For more information, see the “Summary” section on page 81-11.
Step 17 Click Next to display the Run Captures screen, and then click Start to begin capturing packets. Click
Stop to end the capture. For more information, see the “Run Captures” section on page 81-11.
Step 18 Click Get Capture Buffer to determine how much buffer space you have remaining. Click Clear Buffer
on Device to remove the current content and allow room in the buffer to capture more packets.
Step 19 Click Save captures to display the Save Capture dialog box. Choose the format in which you want to
include the captures: ASCII or PCAP. You have the option of saving either the ingress capture, the
egress capture, or both.
Step 20 To save the ingress packet capture, click Save Ingress Capture to display the Save capture file dialog
box. Specify the storage location on your PC, and click Save.
Step 21 Click Launch Network Sniffer Application to start the packet analysis application specified in Tools
> Preferences for analyzing the ingress capture.
Step 22 To save the egress packet capture, click Save Egress Capture to display the Save capture file dialog box.
Specify the storage location on your PC, and click Save.
Step 23 Click Launch Network Sniffer Application to start the packet analysis application specified in Tools
> Preferences for analyzing the egress capture.
Step 24 Click Close, and then click Finish to exit the wizard.