


Installing Summit Family Switches
Summit Family Switches Hardware Installation Guide
120
Installing a Summit Family Switch (Models Other than
Summit X480 and X650 Series)
This section describes how to install the following Summit family switches:
● Summit X150 series
● Summit X250e series
● Summit X350 series
● Summit X450 series
● Summit X450a series
● Summit X450e series
For instructions to install the Summit X480 series switches, see “Installing a Summit X480 Series Switch”
on page 127.
For instructions to install the Summit X650 series switches, see “Installing a Summit X650 Series Switch”
on page 149.
A Summit family switch can be mounted in a standard 19-inch (48.26 cm) rack or placed free-standing
on a tabletop. The installation process includes the following tasks:
1 Install the switch in a rack or on a table.
2 Ground the switch (DC-powered units only).
3 Connect a redundant power supply (if applicable).
4 Connect power cables.
5 Connect network interface cables.
If you are installing Summit family switches for use in a SummitStack configuration, read
Chapter 2, “Building a SummitStack Configuration,” before you install the switches.
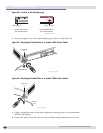
For information about grounding and connecting DC-powered Summit family switches, see “Installing
and Removing Summit DC-Powered Switches” on page 122.
For information about installing and connecting redundant power supplies, see Chapter 6, “Installing
Summit External Power Supplies.”
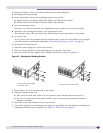
Rack-Mounting a Summit Switch (Models Other than
Summit X480 and X650 Series)
This section describes how to install Summit switches in the following series:
● Summit X150
● Summit X250e
● Summit X350
● Summit X450
● Summit X450a
● Summit X450e