


Summit Family Switches Hardware Installation Guide
89
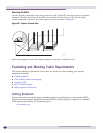
Cable Labeling and Record Keeping
A reliable cable labeling system is essential when planning and installing a network. Maintaining
accurate records helps you to:
● Relocate devices easily.
● Make changes quickly.
● Isolate faults in the distribution system.
● Locate the opposite end of any cable.
● Know the types of network devices that your cabling infrastructure can support.
Follow these guidelines when setting up a cable labeling system suitable for your installation:
● Identify cables by securely attaching labels to all cable ends.
● Assign a unique block of sequential numbers to the group of cables that run between each pair of
wiring closets.
● Assign a unique identification number to each equipment rack.
● Identify all wiring closets by labeling the front panel of your Extreme Networks equipment and
other hardware.
● Keep accurate and current cable identification records.
● Post records near each equipment rack. Include the following cable drop information: the cable
source, destination, and jumper location.
Installing Cable
Consider the following recommendations when you connect cable to your network equipment:
● Examine cable for cuts, bends, and nicks.
● Support cable using a cable manager that is mounted above connectors to avoid unnecessary weight
on the cable bundles.
● Use cable managers to route cable bundles to the left and right of the network equipment to
maximize accessibility to the connectors.
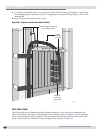
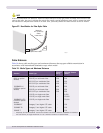
● Provide enough slack, approximately 2 to 3 inches (5.08 to 7.62 cm), to provide proper strain relief as
shown in Figure 66.
● Bundle cable using hook-and-loop straps to avoid injuring cables.
● If you build your own cable, be sure that connectors are properly crimped.
● When installing a patch panel using twisted pair wiring, untwist no more than 1 inch (2.54 cm) of
the cable to avoid radio frequency (RF) interference.
● Discharge the RJ-45 Ethernet cable before plugging it into a port on the switch.
CAUTION
Unshielded twisted pair (UTP) cable can build up ESD charges when being pulled into a new installation. Before
connecting any category 5 UTP cable to the switch, discharge ESD from the cable by plugging the RJ-45
connector into a LAN static discharge device or use an equivalent method.