


Summit Option Cards
Summit Family Switches Hardware Installation Guide
200
Installing a Summit Port Option Card
CAUTION
Summit port option cards are not hot-swappable. Disconnect power to the switch before installing or removing a
Summit option card. After the Summit port option card is installed in a compatible switch, you can hot-swap
pluggable optical modules. Use only optical modules approved by Extreme Networks.
You need the following tools and equipment to install a Summit option card:
● ESD-preventive wrist strap
● # 1 Phillips screwdriver
CAUTION
Be sure that proper ESD controls are in use before switch maintenance is performed. This includes but is not
limited to wrist straps that are grounded to the switch chassis and earth grounds.
All Summit port option cards are installed the same way. The instructions in this section apply to all
option cards for the Summit X350, X450a, and X450e series switches.
To install the Summit port option card:
1 Disconnect the AC power and any redundant power supply from the Summit switch.
2 Attach the ESD-preventive wrist strap to your wrist and connect the metal end to the equipment
rack.
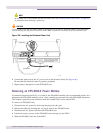
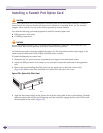
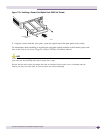
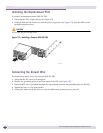
3 Remove the screws holding the filler panel over the option slot on the back of the switch
(Figure 169). Remove the filler panel and set it aside. Save the screws for re-use.
Figure 169: Option Slot Filler Panel
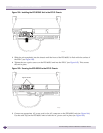
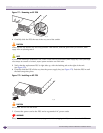
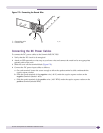
4 Align the sheet metal edges on the option card with the card guides in the switch housing. Carefully
slide the option card into the switch housing until the connectors engage and the card is flush with
the back panel of the switch (Figure 170).
ES4K041
Filler Panel