


Installing Summit Family Switches
Summit Family Switches Hardware Installation Guide
126
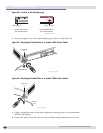
Attaching the DC Wiring Harness to the DC Power Socket on the Switch
After the DC wiring harness is connected to a permanent DC voltage source by a qualified, licensed
electrician, you can remove, replace, and maintain the Summit DC-powered switch without further
electrician assistance.
NOTE
Be sure that the DC circuit is de-energized before you connect the DC wiring harness to the DC power socket.
CAUTION
Be sure that proper ESD controls are in use before switch maintenance is performed. This includes but is not
limited to wrist straps that are grounded to the switch chassis and earth grounds.
To attach the DC wiring harness to the internal DC power supply:
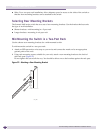
1 Plug the DC wiring harness connector into the DC power supply socket on the rear of the switch
(see Figure 96)
The pins must align properly for the cable to completely connect. Do not force the cable into the
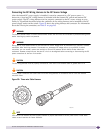
socket until the keyway is aligned properly. Refer to Figure 95 for the DC wiring harness connector.
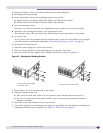
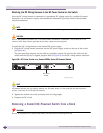
Figure 96: DC Power Socket on a Summit X250e Series DC-Powered Switch
NOTE
Figure 96 shows the rear panel of a Summit X250e series DC-powered switch. The rear panel of other Summit
DC-powered switches may vary slightly; however, the DC power socket is of the same type and the connection
process is the same for all DC-powered switches.
2 Tighten the retainer nut on the connector until it is finger-tight.
3 Energize the DC circuit.
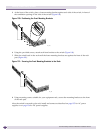
Removing a Summit DC-Powered Switch from a Rack
WARNING!
Be sure to disconnect all DC power cables before you disconnect the chassis ground wire.
SH_068_DC_connector
RedundantPower Input
!SeeManual
-48V
1.5A Max
DC power
socket