


Summit Family Switches Hardware Installation Guide
97
4 Building a SummitStack Configuration
This chapter provides information about how to build and connect a SummitStack configuration. If you
intend to use the SummitStack feature, read this chapter before installing the set of Summit family
switches that will be included in the SummitStack configuration.
For instructions to install Summit family switches in equipment racks, see Chapter 5.
The chapter includes the following topics:
● Stacking Summit Family Switches on page 97
● Placing Summit Family Switches for Stacked Operation on page 100
● Connecting the Switches to Form the Stack Ring on page 101
● Connecting Stacking Cables on page 108
● Connecting Console Ports for a Stack on page 118
● Management Port Cabling on page 118
● Stacking Port LEDs on page 118
Stacking Summit Family Switches
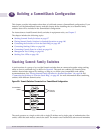
A stack consists of a group of up to eight Summit switches that are connected together using stacking
cables to form a connected ring, as shown in Figure 69. The stack can combine any Summit series
switches that include support for stacking, as long as you follow port compatibility and cabling
recommendations. See “Placing Summit Family Switches for Stacked Operation” on page 100 and
“Connecting the Switches to Form the Stack Ring” on page 101 for more information about combining
switches from different Summit series.
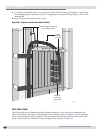
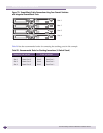
Figure 69: Summit Switches Connected in a SummitStack Configuration
The stack operates as a single switch with a single IP address and a single point of authentication. One
switch, called the stack master, controls the stack. The master runs ExtremeXOS software and maintains
Stack Port 1 Stack Port 2
Stack Port 1 Stack Port 2
Stack Port 1 Stack Port 2
Stack Port 1 Stack Port 2
SH_176
Summit
switches
SummitStack
cables