


Installing Summit Family Switches
Summit Family Switches Hardware Installation Guide
170
NOTE
Cables used for connection to the 10GBASE-T ports on the Summit X650-24t switch must meet the minimum
requirements of the IEEE 802.3an standard.
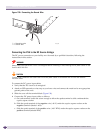
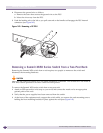
Working carefully, one port at a time:
1 Verify that you have identified the correct cable for the port.
2 Use an alcohol wipe or other appropriate cleaning agent to clean the cable connectors; make sure
they are free of dust, oil, and other contaminants.
3 If you are using optical fiber cable, align the transmit (Tx) and receive (Rx) connectors with the
correct corresponding connectors on the switch or the I/O module.
4 Press the cable connectors into their mating connectors on the switch or I/O module until the cable
connector is firmly seated.
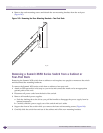
5 Repeat steps 1 through 4 for the remaining cables on this or other switches or I/O modules.
6 Dress and secure the cable bundle to provide appropriate strain relief and protection against bends
and kinks.
Initial Management Access
When you take your switch from the box and set it up for the first time, you must connect to the
console to access the switch and perform initial security configuration. At this time you can also
manually configure an IP address for the default VLAN.
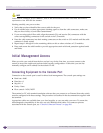
Connecting Equipment to the Console Port
Connection to the console port is used for direct local management. The console port settings are:
● Baud rate—9600
● Data bits—8
● Stop bit—1
● Parity—None
● Flow control—XON/XOFF
The terminal or PC with terminal-emulation software that you connect to an Extreme Networks switch
must be configured with these settings. This procedure is described in the documentation supplied with
the terminal.
Appropriate cables are available from your local supplier, or you can make your own. To ensure the
electromagnetic compatibility of the unit, use only shielded serial cables. For connector pinouts
associated with the console port, see “Console Connector Pinouts” on page 266.