


Installing Summit Family Switches
Summit Family Switches Hardware Installation Guide
150
NOTE
Take care to load the rack so that it is not top-heavy. Start installing equipment at the bottom and work up.
Pre-installation Requirements
Installing the Summit X650 switch requires two people to maneuver the switch and attach mounting
hardware.
To allow safe handling of the switch during the installation process, make sure you have the following
available space around the rack:
● Back: Minimum 30 inches behind the rack posts or back of the cabinet.
● Sides: For a two-post rack installation, allow adequate space for access to the sides of the switch so
that the front mounting brackets can be attached to the switch.
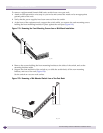
Selecting Rear Mounting Brackets
To allow installation of the switch in cabinets of different depths, the Summit X650 series switch has
two sets of rear mounting brackets. Use the bracket that best suits the cabinet depth or rack depth
where the switch will be installed:
● Shorter brackets—cabinets or racks 25 inches to 31 inches (63.5 cm to 76.7 cm) deep
● Longer brackets—cabinets or racks 25 inches to 36 inches (63.5 cm to 91.4 cm) deep
For a two-post rack installation, the shorter brackets are recommended.
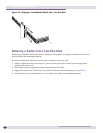
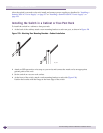
Installing the Switch in a Two-Post Rack
To install the switch in a two-post rack:
1 Attach an ESD-preventive wrist strap to your wrist and connect the metal end to an appropriate
ground point on the rack.
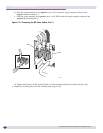
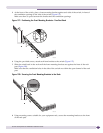
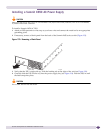
2 Using rack-mounting screws suitable for your rack, attach a rear mounting bracket to the back of
each rack post (Figure 124)
Do not tighten the screws all the way. You should be able to move the brackets against the rack post.