


Summit Family Switches Hardware Installation Guide
137
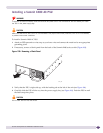
CAUTION
Make sure that the Summit X480 DC PSU circuit is not overloaded. Use proper over-current protection, such as a
circuit-breaker, to prevent over-current conditions. Do not use a breaker rated for higher than 30 Amps.
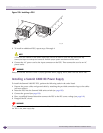
Required Tools and Materials
You need the following tools and materials to install or remove a Summit X480 DC PSU:
● Three spade terminals (Panduit part number PN14-6FN or equivalent) for connecting the ground
and input power cables (provided)
● #14 AWG stranded copper cable for grounding the PSU and connecting the PSU to the DC
power source
DC power and grounding cables are not included with the Summit X480 DC PSU. You must provide
the #14 AWG stranded copper cable. Recommended insulation colors are:
■ Red for the –48V connection (–)
■ Black for the –48V RTN connection (+)
■ Green or green with yellow stripe for the ground connection
● Connection hardware appropriate to the installation site:
■ Hardware for connecting the power wires to the DC source
■ Hardware for connecting the ground wire to the site grounding point
● Stripping tool
● Crimping tool for attaching the lugs to the wires
● #1 Phillips screwdriver
● Torque screwdriver and wrench or torque driver with attachments for tightening screws and nuts
● ESD-preventive wrist strap
● Thermal protective gloves (required for removal of a PSU)
Spade-type connection lugs for power and ground are shipped with the power supply.
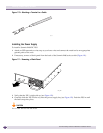
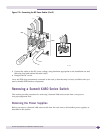
Preparing the Cables
Three spade-type terminals are provided with the PSU. You need a crimping tool to attach the terminals
to the power and ground cables.
To prepare the cables:
1 On each wire, strip 0.25 inch of insulation from one end.
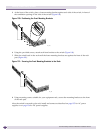
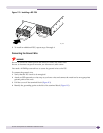
2 Insert the stripped wire end all the way into the barrel of the terminal (Figure 110) and crimp the
terminal securely to the wire.