


Summit Family Switches Hardware Installation Guide
175
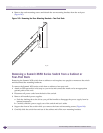
Rack-Mounting the EPS-T
CAUTION
Do not use the rack-mount brackets to suspend the EPS-T from under a table or desk, or to attach the EPS-T to a
wall.
To rack mount the EPS-T:
1 Place the EPS-T upright on a stable surface, with the front facing you.
2 Remove the mounting bracket kit from the packaging.
3 Attach the mounting brackets as follows:
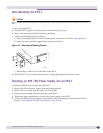
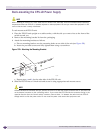
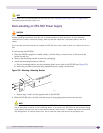
a Place a mounting bracket over the mounting holes on one side of the EPS-T (see Figure 147).
b Insert the screws and fully tighten them using a screwdriver.
Figure 147: Attaching the Mounting Bracket
c Repeat steps a and b for the other side of the EPS-T.
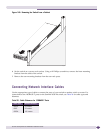
4 Slide the EPS-T into a 19-inch rack and secure it using appropriate rack-mount screws.
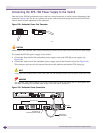
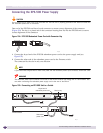
Installing an EPS-160 Power Supply into an EPS-T
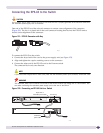
To install an EPS-160 power supply into the EPS-T:
1 Remove the EPS-160 power supply from the packing material.
2 Remove the cover plate from an empty slot on the EPS-T.
3 Insert the power supply into the empty slot on the EPS-T.
4 Tighten the captive thumbscrews to secure the power supply to the EPS-T.
5 Connect the EPS-160 power supply to the Summit switch, following the instructions in the next
section, “Connecting the EPS-160 Power Supply to the Switch.”
ES4K026