Upgrading the printer’s memory C-1
Installing SIMMs into the Elite XL
All Elite XL models come with a certain amount of standard RAM. The RAM
is in the form of a Single Inline Memory Module (SIMM) that resides in one of
the two memory expansion connectors attached to the printer’s controller
board. The memory of all models of the Elite XL can be upgraded to a maxi-
mum total of 64 MB. Increasing the printer’s RAM enables you to print more
complex documents and download more fonts to the printer’s memory.
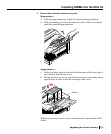
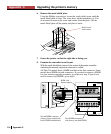
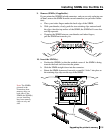
The printer’s memory is upgraded by opening up the printer and inserting a
SIMM into one or both of the memory expansion connectors on the printer’s
controller board. You can place either a 2-, 4-, 8-, 16-, or 32 MB SIMM into
either memory expansion connector; the SIMM capacities of the two SIMMs
do not have to match. The SIMM(s) must be 72-pin, 70 nanoseconds or faster,
non-composite, and tin leaded. (GCC sells 4, 8, and 16 MB memory upgrade
kits. See Appendix J for ordering information.)
Required tools and safety precautions
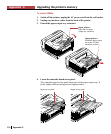
The only tool necessary for the memory installation procedure is a #2 (medium)
Phillips screwdriver. However, it is highly recommended that you also use a
grounding wrist strap during the installation. (See the following paragraph.)
The Elite XL contains highly sensitive components. Be extremely cautious of
electrostatic discharge (ESD). ESD may affect electronic components,
causing intermittent problems or permanent damage to the printer. Work in a
static-safe environment. An antistatic pad on the work bench and floor, a
grounding wrist strap, and an awareness of static-causing articles are important
for this installation.
If you do not have a grounding wrist strap, discharge the build up of static
electricity in your body by touching a grounded metal object.
Appendix
C
Upgrading the printer’s memory
#2 Phillips screwdriver
Grounding
wrist
strap


