


12 GETTING TO KNOW THE M208: Overview of Print Server Installation
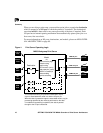
Basic Novell Configuration
PSERVER Setup
The following outlines the basic steps required to add a M208 to a Novell network
using a PSERVER setup and applies to any Netware version. The M208 replaces a
dedicated workstation running PSERVER.EXE or PSERVER.NLM so these are no
longer needed.
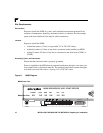
Once the unit is physically attached to the network, you need to:
1 Enter into a PCONSOLE session. PCONSOLE is used for the entire print setup.
2 Create a new queue.
3 Create a new print server. The name will be is M_xxxxxx where xxxxxx is the last
six digits of the Ethernet address as found on the bottom of the unit.
4 Add a new printer and type in the name of one of the eight default destinations on
the unit. (e.g. d1prn, d2com1,etc.) At the prompt for the type field, select
DEFINED ELSEWHERE. If this is not available, choose PARALLEL.
5 Associate this printer with the queue defined in Step 2.
6 Reboot the M208 and wait about a minute for it to connect to the file server.
RPRINTER Setup
The following outlines the basic steps required to add a M208 to a Novell network
using a RPRINTER setup and applies to any Netware version. The M208 interacts
with an existing PSERVER running PSERVER.EXE or PSERVER.NLM.
Once the unit is physically attached to the network, you need to:
1 Enter into a PCONSOLE session.
2 Create a new queue.
3 Select an existing PSERVER and define a new remote printer. The printer name
can be anything but the type must be REMOTE OTHER/UNKNOWN.
4 Associate this printer with the queue created in step 2.
5 Exit PCONSOLE.
6 Restart PSERVER. (e.g. PSERVER.NLM)
7 Go to SYS:\LOGIN and create a directory named M_xxxxxx where xxxxxx is the