


GETTING TO KNOW THE M208: Overview of Print Server Installation 13
last six digits of the Ethernet address as found on the bottom of the unit.
8 Inside this directory, create a file called CONFIG.
9 Enter the line:
set rprinter add
pservername printernumber dest-
name
where pservername is the existing PSERVER’s name, printernumber is the
defined number for this printer in that PSERVER, and destname is a M208 desti-
nation (e.g. d1prn, d3com2, etc.).
10 Reboot the Print Server and wait about a minute for it to connect to the file server.
For more information on Novell PSERVER or RPRINTER configuration, please see
CONFIGURING THE M208 FOR NOVELL on page 63.
Basic Windows Configuration
The following outlines the basic steps required to add a M208 to a Windows NT Ver-
sion 3.5 network using the LPR print method.
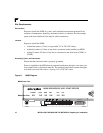
Once the unit is physically attached to the network, you need to:
1 Ensure that the appropriate network software is installed on your host system. In
the Network Settings dialogue box, make sure you see these in the Installed Net-
work Software scroll box:
• MS TCP/IP Printing
• TCP/IP Protocol
• Simple TCP/IP Service
2 Make sure your workstation has an IP address and netmask.
3 Assign an IP address and netmask to the M208. Use a PC or terminal connected to
the Print Server’s serial port to do this. Please see Manual Configuration Through
the COM Port on page 40 for information on completing this step.
4 On your NT workstation, select the Print Manager.
5 Select Create a Printer from the Printer menu.
6 Define the printer name and driver. In the Print to field, select Other...
7 Choose LPR port from the displayed list and select OK.
8 Enter in the name or IP address of the Print Server.
9 Fill in the destination on the Print Server and select OK. The destination will be