


4 - 1
4
Vehicle Mounting and Accessory Installation
Introduction
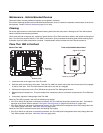
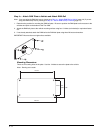
The Thor VM2 is designed to be mounted to a Quick Mount Smart Dock in a vehicle with either a RAM mount or U Bracket sys-
tem. A power cable is provided with the Thor VM2 dock. An optional USB keyboard and keyboard mount is available. Optional
communication cables are available.
Vehicle mounting brackets are specifically designed for vehicle mount applications. The vehicle mounted assembly restrains the
Thor VM2 and isolates it from shock and vibration. A RAM metal table stand is available to secure the Thor VM2 and dock when
in an office environment, for example.
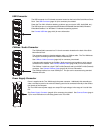
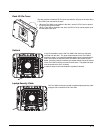
The vehicle mount holds the Quick Mount Smart Dock and the Thor VM2 attaches to the dock. The dock remains attached to
the vehicle, however, the Thor VM2 has a quick release located on the lower rear side that allows the Thor VM2 to easily be
removed from the dock. The Thor VM2 can be operated for a minimum of 30 minutes from an internal UPS battery when not
attached to a dock. The Thor VM2 can be transferred from one dock equipped vehicle to another for easy portability. The dock
provides accessory attachment and conditioned power for the Thor VM2.
Overhead, dash and roof support pillar mounting is via a RAM Mount or U-bracket accessory which includes all the hardware
required for vehicle mounting.
Never put the Thor VM2 into the vehicle mounted assembly until the assembly is securely fastened to the vehicle.
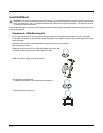
Prepare for Vehicle Mounting
The Thor VM2 should be secured to an area in the vehicle where it:
• Does not obstruct the driver's vision or safe vehicle operation.
• Will be protected from rain or inclement weather.
• Will be protected from extremely high concentrations of dust or wind-blown debris.
• Can be easily accessed by a user seated in the driver's seat while the vehicle is not in operation.
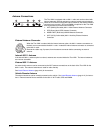
Quick Start
The following list outlines, in a general way, the process to follow when mounting the Thor VM2 in a vehicle. Refer to the fol-
lowing sections in this document for more details.
1. Install RAM Mount (page 4-4) or Install U Bracket Mount (page 4-13) to the vehicle.
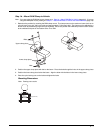
2. Place Thor VM2 in the Dock (page 4-2).
3. Secure the optional external keyboard to either an integrated or remote mounting bracket.
4. Adjust the Thor VM2 to the best viewing angle.
5. Install Remote Antenna (page 4-41) or Install External Antenna (page 4-40) if necessary.
6. Connect Cables (page 4-16) for any peripherals.
7. Connect vehicle power:
• 12-48 VDC Vehicles (10-60 VDC Direct Connection) (page 4-18)
• 60-144 VDC Vehicles (50-150 VDC Power Supply, Screws on Top of Lid) (page 4-27)
• 60-144 VDC Vehicles (50-150 VDC Power Supply, Screws on Side of Lid) (page 4-23).
• Thor VX8 / Thor VX9 Adapter Cable (page 4-32)
• VX6 / VX7 Adapter Cable (page 4-31)
8. Secure all cables in Strain Relief Cable Clamps (page 4-16).
The Thor VM2 is ready for use.