


4 - 19
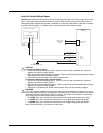
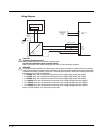
• Auto-On Control Wiring Diagram (page 4-21)
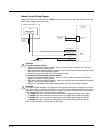
• Manual Control Wiring Diagram (page 4-22)
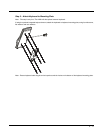
5. Route the power cable the shortest way possible removing any left-over cable. The cable is rated for a maxi-
mum temperature of 105°C (221°F). Therefore, when routing this cable it should be protected from physical
damage and from surfaces that might exceed this temperature. Cable should be protected from physical
damage from moving parts. Do not expose the cable to chemicals or oil that may cause the wiring insulation
to deteriorate. Always route the cable so that it does not interfere with safe operation and maintenance of the
vehicle.
6. Provide mechanical support for the cable by securing it to the vehicle structure at approximately one foot inter-
vals, taking care not to over tighten and pinch conductors or penetrate outer cable jacket.
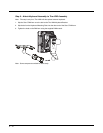
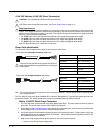
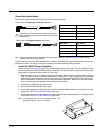
7. Connect the watertight connector end of the power cable to the Thor VM2 Quick Mount Smart Dock power
connector by aligning the connector pins to the power connector; push down on the watertight connector and
twist it to fasten securely.
8. Secure the power cable to the Thor VM2 using the Strain Relief Cable Clamps (page 4-16).
9. Place Thor VM2 in the Dock (page 4-2)
10. If using the Screen Blanking (page 4-33) feature, install the screen blanking box or switch.
11. Press the Power Switch (page 3-5) on the back of the Thor VM2 dock.
12. Press the Power Button (page 3-5) on the front of the Thor VM2 to turn on the Thor VM2.
Once installation is complete, remember to start the Thor VM2 and select the desired Power Scheme to enable
Auto-On, Ignition Control or Manual Control of the Thor VM2 boot up process.
See the Power Schemes tab of the Power Options (page 5-22) control panel.