


4 - 29
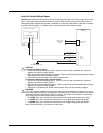
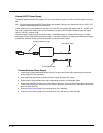
6. Route the wiring from the DC/DC power supply to the vehicle’s electrical system. Do not connect to vehicle
power at this time.
7. Strip the wire ends and connect to the input side of the DC/DC power supply.
8. Use looms and wire ties to secure all wiring as shown.
9. Reattach the cover with the screws.
10. Connect the DC/DC power supply to the vehicle’s electrical system as directed below
11. While observing the Fuse Requirements (see page 4-27), connect the power cable as close as possible to the
actual battery terminals of the vehicle. When available, always connect to unswitched terminals in the vehicle
fuse panel, after providing proper fusing.
ATTENTION: For uninterrupted power, electrical supply connections should not be made at any point
after the ignition switch of the vehicle.
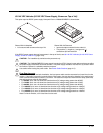
12. Use proper electrical and mechanical fastening means for terminating the cable. Properly sized “crimp” type
electrical terminals are an accepted method of termination. Select electrical connectors sized for use with
18AWG (1mm
2
) conductors.
13. Provide mechanical support for the cable by securing it to the vehicle structure at approximately one foot inter-
vals, taking care not to over tighten and pinch conductors or penetrate the outer cable jacket.
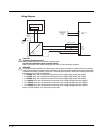
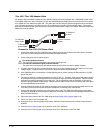
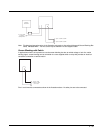
14. Connect the watertight connector end of the power cable to the Thor VM2 Quick Mount Smart Dock power
connector by aligning the connector pins to the power connector; push down on the watertight connector and
twist it to fasten securely.Flip the power switch on the back of the dock to On.
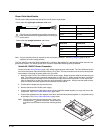
15. Secure the power cable to the Thor VM2 using the Strain Relief Cable Clamps (page 4-16).
16. Place Thor VM2 in the Dock (page 4-2)
17. If using the Screen Blanking (page 4-33) feature, install the screen blanking box or switch.
18. Press the Power Switch (page 3-5) on the back of the Thor VM2 dock.
19. Press the Power Button (page 3-5) on the front of the Thor VM2 to turn on the Thor VM2.
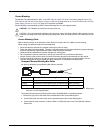
Once installation is complete, remember to start the Thor VM2 and select the desired Power Scheme to enable
Auto-On or Manual Control of the Thor VM2 boot up process.
See the Power Schemes tab of the Power Options (page 5-22) control panel.
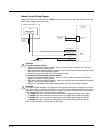
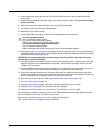
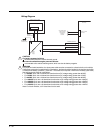
Note: Ignition control is not available for trucks over 60VDC.
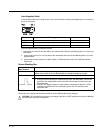
For battery powered vehicles:
+ is connected to battery positive.
- must be connected to battery negative.:
must be connected to the vehicle chassis ground.
For internal combustion engine powered vehicles:
+ is connected to battery positive.
- is connected to battery negative.
is connected to the vehicle chassis ground, which can also be battery negative.
!