


118
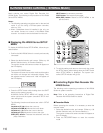
● Manual Recording
1. Enter the recorder mode (Refer to p. 116 Recorder
Mode.)
2. To start recording, press the WIDE and TELE buttons
simultaneously.
The digital disk recorder will start recording.
3. To stop the recording, press the STOP button while
holding down the SHIFT button.
Note: Refer to WJ-HD500 Series Operating Instructions
for details and other recording modes.
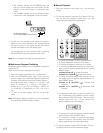
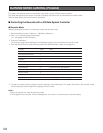
● Search Playback
You can search playback images using the Record List or
Thumbnail Display. Every time you press the INDEX button,
the display will change as follows.
Live image → Record List → Thumbnail Display -→ Live
image
You can operate the Record List or Thumbnail Display by
referring to the recorder’s operating instructions. In addi-
tion, the following operations from the system controllers
are also available.
Joystick to UP (D): Moves the cursor up.
Joystick to DOWN (C): Moves the cursor down.
Joystick to L (A): Moves the cursor to the left.
Joystick to R (B): Moves the cursor to the right.
CAM(SET) button: Displays the search editing area./Starts
the search after you enter the search condition.
MON(ESC)button: Cancels the search editing area and
returns to the Record List or Thumbnail Display.
NEXT button: Increments a parameter.
PREV button: Decrements a parameter.
PLAY button: Starts the playback of a record pointed by
the cursor.
Note: The PLAY button is deactivated in the search editing
area.
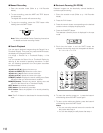
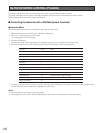
● Electronic Zooming (EL-ZOOM)
Playback images can be electrically zoomed besides a
camera's optical zooming.
1. Enter the recorder mode (Refer to p. 116 Recorder
Mode.)
2. Press the PLAY button.
3. Press the numeric button corresponding on the desired
camera number to display the spot picture.
4. Press the CAM (SET) button.
The selected camera’s picture is displayed in the spot
mode.
5. Each time the button 4 and the SHIFT button are
pressed, the zooming range are changeable as follows:
2x → 4x → 8x → 1x → 2x
6. To return the zooming range to x 1, press the button 4
while holding down the SHIFT button again.
7. To return to the multiscreen display, press the button 0
while holding down the SHIFT button.
Notes:
• You can move the zoomed area on the monitor with
the joystick after Step 4.
• You can also display the still picture after step 4.
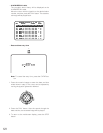
WIDE TELE
ZOOM
REC
SETUP
SHIFT
REW/FF
STEP
GROUP SEQ
PAUSE
F2
TOUR SEQ
PREV NEXT
STOP
OSD
RECORDER
INDEX
STOP PLAY PAUSE
MON LOCK
DEF ON
WIPER
DEF OFF
MON (ESC)
T&D CAM ID
MON STATUS
ALL
EVENT
ALM H VLD H SYS S
CAM (SET)
MULTI SCREEN SEL
SEQUENCE
AUX2 ONAUX2 OFF
EL-ZOOM
AUX1 ONAUX1 OFF
STILL
UP
LR
DOWN