


User's Guide
Cleaning and Maintenance 5-7
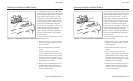
Replacing the Ribbon Cartridge
When printing becomes too light, you should replace the ribbon cartridge.
Follow the procedures for Installing the Ribbon Cartridge in the Set
Up section of this guide.
Replacing the Fuse
When the printer is plugged into a power outlet that you have verified is
supplying the correct voltage, but the printer shows no sign of operation,
the main power fuse may have blown. A blown fuse is a strong indica-
tion that the power line is supplying unstable voltage and you should try a
different one.
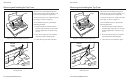
To check and replace the fuse, use the following procedure:
1. Turn off the printer and detach the power cord.
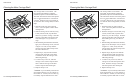
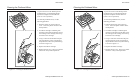
2. Slide open the fuse compartment. The innermost fuse in the com-
partment is the main power fuse. The other fuse is a spare.
3. Check the main power fuse to make sure that it is in good condition.
If it is blown, replace it with the spare fuse. Make sure that the
rating on the side of the spare fuse matches the required fuse rating
shown on the serial number label on the side or rear of the printer.
4. Close the fuse compartment and re-attach the power cable.
5. Run a printer self test to verify normal operation.
)Note: For instructions on locating the fuse, refer to the Checking the
Voltage Select Switch procedure in the Set Up section of this guide.
User's Guide
Cleaning and Maintenance 5-7
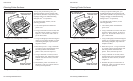
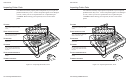
Replacing the Ribbon Cartridge
When printing becomes too light, you should replace the ribbon cartridge.
Follow the procedures for Installing the Ribbon Cartridge in the Set
Up section of this guide.
Replacing the Fuse
When the printer is plugged into a power outlet that you have verified is
supplying the correct voltage, but the printer shows no sign of operation,
the main power fuse may have blown. A blown fuse is a strong indica-
tion that the power line is supplying unstable voltage and you should try a
different one.
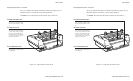
To check and replace the fuse, use the following procedure:
1. Turn off the printer and detach the power cord.
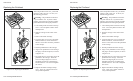
2. Slide open the fuse compartment. The innermost fuse in the com-
partment is the main power fuse. The other fuse is a spare.
3. Check the main power fuse to make sure that it is in good condition.
If it is blown, replace it with the spare fuse. Make sure that the
rating on the side of the spare fuse matches the required fuse rating
shown on the serial number label on the side or rear of the printer.
4. Close the fuse compartment and re-attach the power cable.
5. Run a printer self test to verify normal operation.
)Note: For instructions on locating the fuse, refer to the Checking the
Voltage Select Switch procedure in the Set Up section of this guide.