


User's Guide
4-4 Control Panel
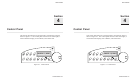
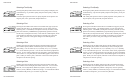
Using the Select-Dial
You turn the Select-dial to move the paper up and down, move the car-
riage back and forth, scroll through the Setup menu, and fine adjust the
print density.
Moving the Paper Up and Down
To move the paper up and down, press the Ready button to disable print-
ing and then turn the Select-dial. To advance the paper, turn the dial
clockwise; to reverse-feed the paper, turn the dial counterclockwise.
After moving the paper, press the Ready button again to re-enable
printing. When you move the paper with the dial, printer logic does not
change the internal line count. This enables you to decide where the first
print line should be and where line counting begins.
Moving the Carriage Back and Forth
To move the carriage back and forth, first press the Ready button to dis-
able printing. Then, hold down the Alt button and turn the dial. To move
the carriage to the right, turn the dial clockwise; to move the carriage
left, turn the dial counterclockwise. You may have to move the car-
riage to install a ribbon cartridge or clear a paper jam. Moving the
carriage does not affect the print position. When printing begins, the
carriage moves back to its original position.
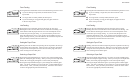
Scrolling Through the Setup Menu
Whenever the Setup menu is displayed, you use the Select-dial to scroll
through the menu and make selections. You'll learn how use the Setup
menu later in this section.
Fine Adjusting the Print Density
To fine adjust the print density, hold down the Print Density button and
turn the Select-dial. A print density adjustment scale appears on the dis-
play to show you the adjustment range. To make printing darker, turn the
dial clockwise; to make printing lighter, turn the dial counterclockwise.
This adjustment is effective only when the printer is in the automatic print
density mode. The printer retains this adjustment even when turned off.
User's Guide
4-4 Control Panel
Using the Select-Dial
You turn the Select-dial to move the paper up and down, move the car-
riage back and forth, scroll through the Setup menu, and fine adjust the
print density.
Moving the Paper Up and Down
To move the paper up and down, press the Ready button to disable print-
ing and then turn the Select-dial. To advance the paper, turn the dial
clockwise; to reverse-feed the paper, turn the dial counterclockwise.
After moving the paper, press the Ready button again to re-enable
printing. When you move the paper with the dial, printer logic does not
change the internal line count. This enables you to decide where the first
print line should be and where line counting begins.
Moving the Carriage Back and Forth
To move the carriage back and forth, first press the Ready button to dis-
able printing. Then, hold down the Alt button and turn the dial. To move
the carriage to the right, turn the dial clockwise; to move the carriage
left, turn the dial counterclockwise. You may have to move the car-
riage to install a ribbon cartridge or clear a paper jam. Moving the
carriage does not affect the print position. When printing begins, the
carriage moves back to its original position.
Scrolling Through the Setup Menu
Whenever the Setup menu is displayed, you use the Select-dial to scroll
through the menu and make selections. You'll learn how use the Setup
menu later in this section.
Fine Adjusting the Print Density
To fine adjust the print density, hold down the Print Density button and
turn the Select-dial. A print density adjustment scale appears on the dis-
play to show you the adjustment range. To make printing darker, turn the
dial clockwise; to make printing lighter, turn the dial counterclockwise.
This adjustment is effective only when the printer is in the automatic print
density mode. The printer retains this adjustment even when turned off.