


User's Guide
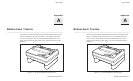
A-4 Bottom-Feed Tractors
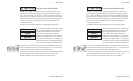
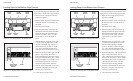
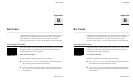
Loading Paper in the Bottom-Feed Tractors
To load pin-feed paper into the bottom-feed
forms tractors, use the following procedure:
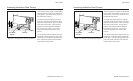
1. Raise the front of the printer onto the
pop-down supports.
2. Pull forward on the tractor locking levers
so that the tractors can slide freely on
the shafts.
3. Open both tractor doors.
4. Push the leading edge of the paper up
through the slot in the printer stand and
mount the first three paper holes onto
the tractor pin belts. Then, close the
tractor doors to secure the paper in
place.
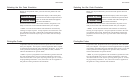
5. Slide the tractors and paper left or right
as needed until the paper holes on the
left side of the paper align with the
circles on the ruler, as shown in figure
A-4. Then, push back the left tractor
locking lever to lock that tractor in place.
6. Slide the right tractor to the right until the
paper is snug between the tractors.
Then, push back the right tractor locking
lever to lock that tractor in place. Make
sure that the paper is not too tight or too
loose between the tractors, since this
could cause paper feeding problems.
7. Press the Form Feed button on the con-
trol panel. The paper will advance to
the ready-to-print position.
8. Lower the front of the printer.
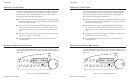
LOCKING
LEVER
TRACTOR
DOOR
PIN
BELT
PAPER
GUIDE
PAPER
SENSOR
PAPER
GUIDE
RULERALIGN PAPER
HOLES OVER
CIRCLES
Figure A-4. Loading Paper in the Bottom Path
Figure A-5. Aligning Paper in the Bottom Path
User's Guide
A-4 Bottom-Feed Tractors
Loading Paper in the Bottom-Feed Tractors
To load pin-feed paper into the bottom-feed
forms tractors, use the following procedure:
1. Raise the front of the printer onto the
pop-down supports.
2. Pull forward on the tractor locking levers
so that the tractors can slide freely on
the shafts.
3. Open both tractor doors.
4. Push the leading edge of the paper up
through the slot in the printer stand and
mount the first three paper holes onto
the tractor pin belts. Then, close the
tractor doors to secure the paper in
place.
5. Slide the tractors and paper left or right
as needed until the paper holes on the
left side of the paper align with the
circles on the ruler, as shown in figure
A-4. Then, push back the left tractor
locking lever to lock that tractor in place.
6. Slide the right tractor to the right until the
paper is snug between the tractors.
Then, push back the right tractor locking
lever to lock that tractor in place. Make
sure that the paper is not too tight or too
loose between the tractors, since this
could cause paper feeding problems.
7. Press the Form Feed button on the con-
trol panel. The paper will advance to
the ready-to-print position.
8. Lower the front of the printer.
LOCKING
LEVER
TRACTOR
DOOR
PIN
BELT
PAPER
GUIDE
PAPER
SENSOR
PAPER
GUIDE
RULERALIGN PAPER
HOLES OVER
CIRCLES
Figure A-4. Loading Paper in the Bottom Path
Figure A-5. Aligning Paper in the Bottom Path