


User's Guide
4-36 Control Panel
Set Print Density
PH GAP lets you enable and disable automatic forms thickness detection.
When set to Auto, the printer automatically detects forms thickness and
adjusts the print gap (that is, the physical distance between the printhead
and the form) for optimal print density.
If necessary, you can disable this function and manually select a fixed
print gap. This causes the printer to move the printhead a fixed distance
away from the platen, regardless of the actual forms thickness. To set
the print gap manually, set this parameter to a value from 10 to 45. A
setting of 10 moves the printhead as close to the platen as possible and
results in the darkest printing. Conversely, a setting of 45 moves the
printhead as far from the platen as possible and results in the lightest
printing.
,Caution: Use care when disabling automatic forms thickness detec-
tion. If a manual setting is too high, printing may be too light or disappear
altogether. If a manual setting is too low, the ribbon can snag on the
printhead causing damage to both the ribbon and printhead.
Set Print Force
PFORCE lets you enable and disable automatic print force control.
When set to Auto, the printer automatically adjusts the print force so that
it is optimal for the form being printed.
If necessary, you can disable this function and manually select a fixed
print force. This causes the printer to use the selected print force when
printing all forms, regardless of the actual forms thickness. To set the
print force manually, set this parameter to a value from 1 to 10. A
setting of 1 weakens the print force and results in lighter printing. Con-
versely, a setting of 10 strengthens the print force and results in darker
printing.
,Caution: Printing with too much print force reduces the life of the
printhead and also increases printing noise.
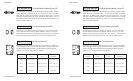
41) PFORCE:Auto
40) PH GAP: Auto
User's Guide
4-36 Control Panel
Set Print Density
PH GAP lets you enable and disable automatic forms thickness detection.
When set to Auto, the printer automatically detects forms thickness and
adjusts the print gap (that is, the physical distance between the printhead
and the form) for optimal print density.
If necessary, you can disable this function and manually select a fixed
print gap. This causes the printer to move the printhead a fixed distance
away from the platen, regardless of the actual forms thickness. To set
the print gap manually, set this parameter to a value from 10 to 45. A
setting of 10 moves the printhead as close to the platen as possible and
results in the darkest printing. Conversely, a setting of 45 moves the
printhead as far from the platen as possible and results in the lightest
printing.
,Caution: Use care when disabling automatic forms thickness detec-
tion. If a manual setting is too high, printing may be too light or disappear
altogether. If a manual setting is too low, the ribbon can snag on the
printhead causing damage to both the ribbon and printhead.
Set Print Force
PFORCE lets you enable and disable automatic print force control.
When set to Auto, the printer automatically adjusts the print force so that
it is optimal for the form being printed.
If necessary, you can disable this function and manually select a fixed
print force. This causes the printer to use the selected print force when
printing all forms, regardless of the actual forms thickness. To set the
print force manually, set this parameter to a value from 1 to 10. A
setting of 1 weakens the print force and results in lighter printing. Con-
versely, a setting of 10 strengthens the print force and results in darker
printing.
,Caution: Printing with too much print force reduces the life of the
printhead and also increases printing noise.
41) PFORCE:Auto
40) PH GAP: Auto