


User's Guide
5-10 Cleaning and Maintenance
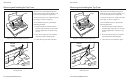
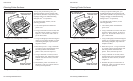
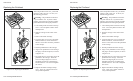
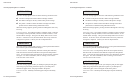
Replacing the Printhead
When the printhead wears out, you should
replace it with a new one. To do so, use
the following procedure:
Warning: The printhead can become
very hot while in use. If you have been
printing, wait at least five minutes with the
printer idle before touching the printhead.
1. Turn off the printer and remove the top
cover. Leave the platen window in the
raised position.
2. Slide the carriage to the center of the
printer.
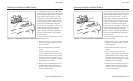
3. Remove the ribbon cartridge.
4. Using the edge of a coin or a small flat-
blade screwdriver, loosen and remove
the two screws that secure the printhead
to the carriage.
5. Pull the printhead out of the carriage.
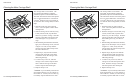
6. Align a new printhead over the carriage
and plug it into the receptacle, as shown
in figure 5-10.
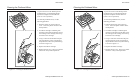
7. Re-install the two screws that secure the
printhead to the carriage. When the
screws are finger-tight, use a coin or
flat-blade screwdriver to tighten them
another half turn. DO NOT overtighten
the screws.
8. Replace the ribbon cartridge and top
cover. Then, run a printer self test to
verify normal operation.
Figure 5-10. Replacing the Printhead
User's Guide
5-10 Cleaning and Maintenance
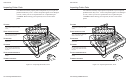
Replacing the Printhead
When the printhead wears out, you should
replace it with a new one. To do so, use
the following procedure:
Warning: The printhead can become
very hot while in use. If you have been
printing, wait at least five minutes with the
printer idle before touching the printhead.
1. Turn off the printer and remove the top
cover. Leave the platen window in the
raised position.
2. Slide the carriage to the center of the
printer.
3. Remove the ribbon cartridge.
4. Using the edge of a coin or a small flat-
blade screwdriver, loosen and remove
the two screws that secure the printhead
to the carriage.
5. Pull the printhead out of the carriage.
6. Align a new printhead over the carriage
and plug it into the receptacle, as shown
in figure 5-10.
7. Re-install the two screws that secure the
printhead to the carriage. When the
screws are finger-tight, use a coin or
flat-blade screwdriver to tighten them
another half turn. DO NOT overtighten
the screws.
8. Replace the ribbon cartridge and top
cover. Then, run a printer self test to
verify normal operation.
Figure 5-10. Replacing the Printhead