


Configuration Using IPAssign
33
13. If you want to store the TCP/IP settings into the PrintNet flash
memory via a browser, click on LAUNCH BROWSER at the next
window that displays. This will prevent you from losing the settings
after a power cycle. If not, click “No.”
14. Read the text in the “Configuration Information” window that displays
and click OK to launch your Web browser.
NOTE: If you are returned to the IPAssign main dialogue box, you will be
unable to launch your browser this way. Please load it manually
and go to the URL, “
http://
PrintNetIPaddress
/
networkConf.html
” (e.g., “http://192.75.11.9/
networkConf.html
”) or use a Telnet server: “Telnet
IP_address
.”
15. Once your Web browser is loaded and you are prompted for a “User
ID,” type “
root.”
16. At the “Password” prompt, press ENTER since there is no default
password configured and click OK.
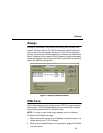
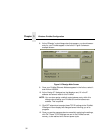
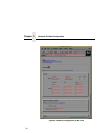
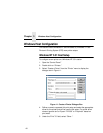
17. At the “Network Configuration” HTML form that displays, fill in the
PrintNet IP address under the “IP Address” field. Figure 9 shows an
example configuration form.
18. Click in the field labeled “Subnet Mask” and fill in the PrintNet subnet
mask.
NOTE: If you would like to communicate with the PrintNet from across
routers, you will need to fill in an entry within the “Routing”
section. Please see “Communicating Across Routers” on page 37
for more details.
19. Click on the SUBMIT button when done.
20. Turn the printer off, then on again so the changes take effect, or click
on the “System” link at the top of the “Network Configuration” HTML
form. Once at the “System” form, click on the REBOOT button.