


Chapter 6 Novell PrintNet Configuration (10/100Base-T)
98
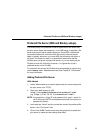
3. Select the print server you have been using for your PSERVER setup
and press ENTER. By default this will be “M_
xxxxxx
” where “
xxxxxx
”
equals the last six digits of the print server’s Ethernet address found
on the bottom of the device (e.g. “M_091C1A”).
4. Select “Print Server Configuration” from the menu that displays.
5. Select “Printer Configuration” from the next menu to display a list of
configured printers.
6. Select the printer you wish to alter the poll time for and press ENTER.
7. Change the “Sampling Interval” to the desired number (in seconds).
NOTE: You may also want to change the “Service mode for forms” to
“Change forms as needed”. If you do not do this, the PrintNet will
need to poll the file server twice as much to get all the information
it needs.
8. Press ESCAPE and select “Yes” to save the changes to this new
printer.
9. Re-power the PrintNet by turning the printer off and on to make the
changes take effect.
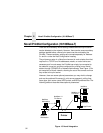
Changing the PrintNet Name
(NDS and Bindery setups)
When defining a new print queue on a Novell file server, a new print
server must be defined to represent the PrintNet. This name must match
the pre-defined name given to the print server. By default, this name is in
the format “M_
xxxxxx
” where “
xxxxxx
” equals the last six digits of the
PrintNet’s Ethernet address found on the bottom of the device (e.g.
“M_091C1A”). You must make sure that the print server object that you
are using for your PSERVER setup has the same name as that stored on
the PrintNet. If you need to rename the print server object in Netware
Administrator, please delete the object, and re-create it with the new
name. Netware administrator seems to have some problems with
renaming objects.
NOTE: Changing the name will effect all of the protocols that are running
on the PrintNet.