


Problem Resolution5Ć36
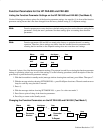
Use the following procedure to change the function parameters:
1. With the fax machine in standby mode (message window showing date and time), press Advanced Functions.
Then press 7.
2. With the message window showing SET MODE NO. =, press Dial/Space four times. The unit sounds an error
beep for each key entry, but this is normal.
3. Press :.
4. With the message window showing SET MODE NO. =, press 1 to select test mode 1.
5. Press Start.
6. Enter both digits of the desired function parameter number. If you enter an invalid number, an error beep
sounds. The shipment setting value of the parameter is shown in brackets followed by the present value after
you enter the number. See Table 5-7 for a listing of the function parameters.
7. Press Start.
8. Enter the new value for the function parameter. (It may be necessary to first press Copy/Clear to remove the
old value.) The new value overrides the existing function parameter value.
9. Press Start to store (or confirm) the new value and increment to the next function parameter.
10. You can scroll through the function parameters by pressing the Photo (ƞ) or the Stamp (Ɵ) button.
11. Press Stop twice to return to the standby mode.
Caution Do not change any function parameter unless recommended in a troubleshooting procedure or by
HP Customer Support Center personnel.
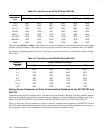
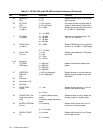
Table 5-7. HP FAX-900 and FAX-950 Function Parameters
No. Parameter Selections Function
00
(FAX-950
Only)
POLLED FILE SAVE
(Off)
1 = Off (delete auto)
2 = On (no automatic delete)
Selects whether or not to automati-
cally delete a polled document in the
memory after it is retrieved
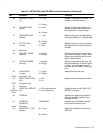
01 ALARM STATUS
(Timer)
1 = Timer (6 seconds)
2 = Constant
Selects No Paper and No ink/toner
alarm status. If “Constant” is se-
lected, the alarm will not stop until the
“Stop” button is pressed
02-03 Not Used
04 NUMERIC ID SET
(On)
1 = Off (will not accept)
2 = On (accepts)
Selects whether or not the machine
will accept a Numeric ID or a change
to a Numeric ID
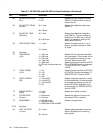
05 LANGUAGE Selects language. Press “ƞ” or “Ɵ”
to select displayed language
06 ID DISPLAY
(Chara)
1 = Numer (Numeric ID)
2 = Chara (character ID)
Selects which type of ID will be dis-
played
07 JNL COLUMN
(Station)
1 = Preset station name
2 = Received ID
Selects contents of ID column on the
Journal