


Section 5 OTHER CONVENIENT FUNCTIONS
5-65
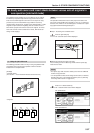
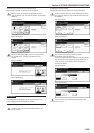
6 Specifying the direction that the originals were set
This procedure specifies the direction of the set originals.
1
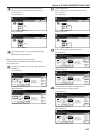
With the content of the “Basic” tab displayed, touch the
“Orig.set direction” key. The “Orig.set direction” screen will be
displayed.
Inch specifications
Ready to Job build.
Place originals then press Start key.
1 sided 1 sided copy
Back Edge
1 sided/
2 sided
1 sided copy-Left
Finished page #:0
Orig. set
direction
Original
type
AMS
Reduce
/Enlarge
Finished
Basic Quality Edit
Offset
Job Build - Step1
End
Insert
page
Set
Select
paper
11x8
1
/
2
”
Metric specifications
Ready to Job build.
Set original. Press Start key.
1-sided 1-sided Copy
Back Edge
1-sided/
2-sided
1-sided Copy-Left
Finished page #: 0
Orig. set
direction
Original
type
AMS
Reduce/
Enlarge
Finished
Basic Quality Edit
Group
Job Build
-Step 1
End
Set
Select
paper
Insert
blank page
2
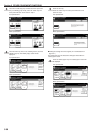
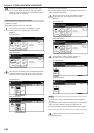
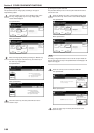
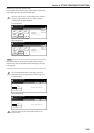
Touch the “Rear” [“Back Edge”] key or the “Left top corner”
key, as appropriate, according to the direction of the
originals.
Inch specifications
Org. set direction
"Check direction original" can be shown
at right side of display.
Follow the steps. If setting mode is
wrong, incorrect copy will result.
Ready to Job build.
Place originals then press Start key.
CloseBack
Set
Rear
Left top
corner
Check direction
Check direction of
original top side.
Metric specifications
Orig. set direction
"Check direction original" can be shown
at right side of display.
Follow the steps. If setting mode is
wrong, incorrect copy will result.
Ready to Job build.
Set original. Press Start key.
CloseBack
Set
Back Edge
Left top
corner
Check direction
Check direction of
original.
IMPORTANT!
If the designation for the direction that the originals are set is not
correct, copying may be accomplished incorrectly.
3
Touch the “Close” key. The touch panel will return to the
screen in step 1.
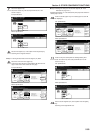
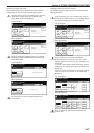
7 Setting the scanning density
This procedure sets the copy exposure for the finished copies.
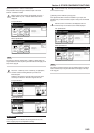
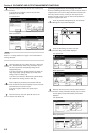
1
Touch the “Quality” key. Then, in the resulting screen, touch
the “Exposure mode” key. The “Exposure mode” screen will
be displayed.
Inch specifications
Exposure
mode
Text+PhotoDensity 4 Off
Eco Print
1 sided copy-Left
Finished page # : 0
Orig. image
quality
Basic Quality Edit
Job Build - Step1
End
Insert
page
Ready to Job build.
Place originals then press Start key.
Set
Metric specifications
Exposure
mode
Text + PhotoManual 4 Off
Eco Print
1-sided Copy-Left
Finished page #: 0
Image
quality
Basic Quality Edit
Job Build - Step1
End
Ready to Job build.
Set original. Press Start key.
Set
Insert
blank page
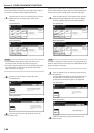
2
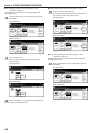
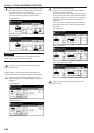
If you want to have the copy exposure selected
automatically, touch the “Auto” key.
If you want to manually set the exposure, touch the “Manual”
key and then touch the “Lighter” key or the “Darker” key to
move the cursor on the exposure scale and adjust the
exposure as desired.
Inch specifications
Exposure mode
Auto
Manual Lighter Darker
Ready to Job build.
Place originals then press Start key.
CloseBack
Set
Metric specifications
Exposure mode
Auto
Manual Lighter Darker
Ready to Job build.
Set original. Press Start key.
CloseBack
Set
3
Touch the “Close” key. The touch panel will return to the
screen in step 1.