Section 5 OTHER CONVENIENT FUNCTIONS
5-67
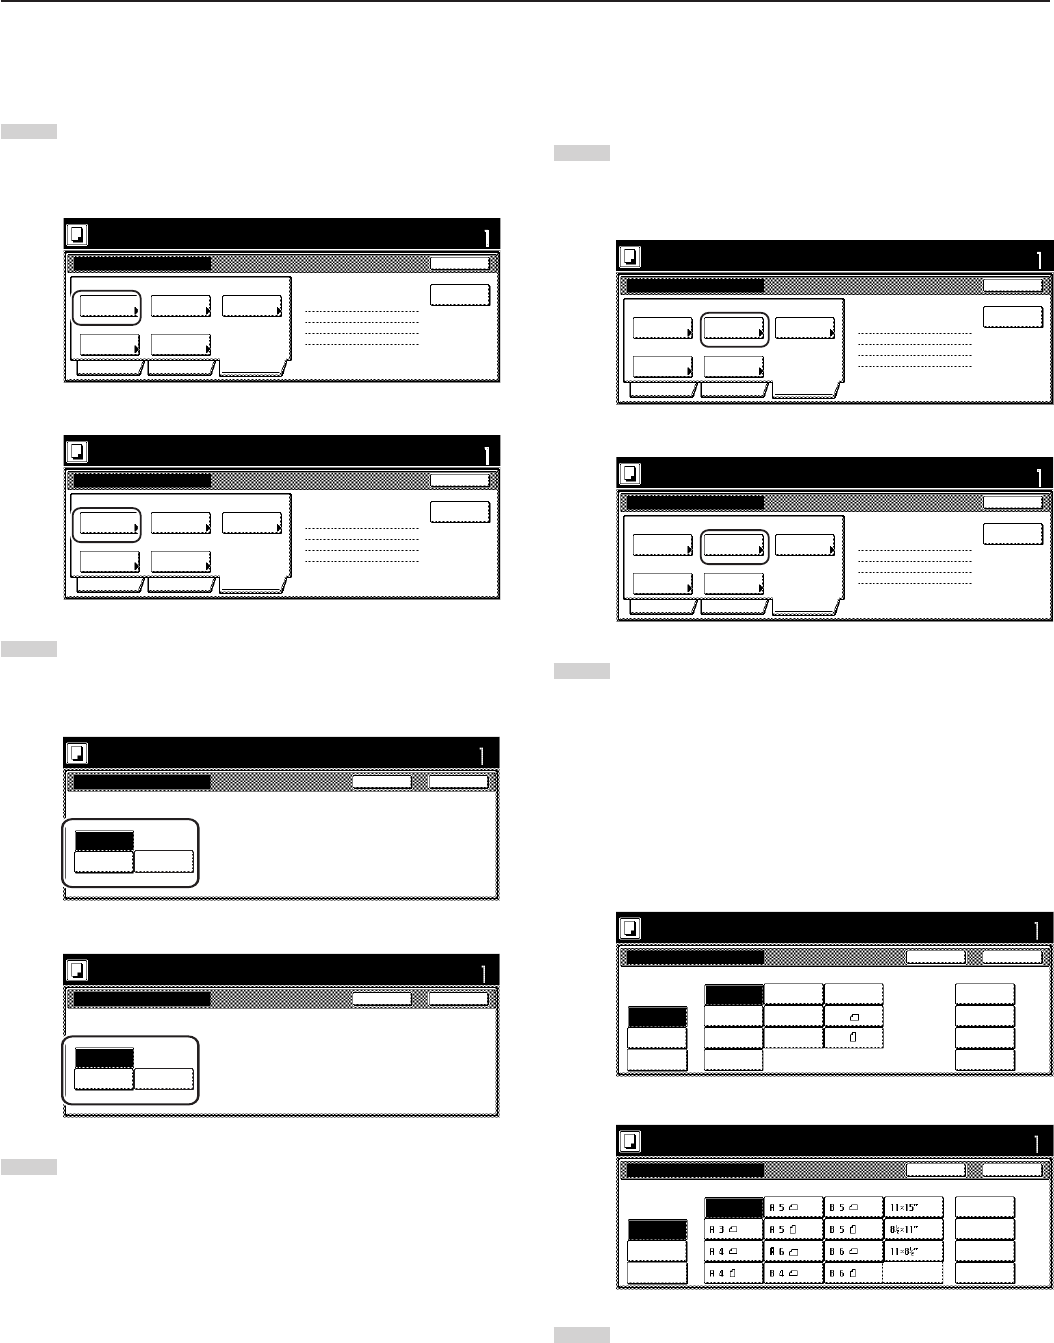
0 Selecting the sheet erase mode
This procedure selects the sheet erase mode in order to erase the
shadows, lines, etc., that can occur around the edges of copies.
1
Touch the “Edit” key. Then, in the resulting screen, touch the
“Border Erase” [“Erase Mode”] key. The “Border Erase”
[“Erase Mode”] screen will be displayed.
Inch specifications
Border
Erase
Auto
Modify
Copy
Select
orig.size
None
Page #
Margin/
Centering
None
Off
Off
2 sided copy-Left
Finished page # : 0
Basic Quality Edit
Job Build - Step1
End
Insert page
Ready to Job build.
Place originals then press Start key.
Set
Metric specifications
Erase
Mode
Auto NoneOff
Modify
copy
Select
size orig.
NoneNone
Page
numbering
Margin/
Imag.shift
2-sided Copy-Left
Finished page #: 0
Basic Quality Edit
Job Build - Step1
End
Ready to Job build.
Set original. Press Start key.
Set
Insert
blank page
2
Touch the “Sheet Erase” [“Border erase”] key or “Individual
BordrErase” [“Individual Erase Mode”] key and then set the
desired border width.
Inch specifications
Ready to Job build.
Place originals then press Start key.
Border Erase
None
Sheet
Erase
Individual
BordrErase
Set
CloseBack
Erase the border shadow of original.
Metric specifications
Erase Mode
None
Border
erase
Individual
Erase Mode
Erase edge of original copy.
Ready to Job build.
Set original. Press Start key.
CloseBack
Set
3
Touch the “Close” key. The touch panel will return to the
screen in step 1.
! Manually selecting the size of the originals
This procedure allow you to select the size of the originals manually
using the touch panel.
1
Touch the “Edit” key. Then, in the resulting screen, touch the
“Select orig. size” [“Select size orig.”] key. The “Select original
size” [“Select size original”] screen will be displayed.
Inch specifications
Border
Erase
Auto
Modify
Copy
Select
orig.size
None
Page #
Margin/
Centering
None
Off
Off
2 sided copy-Left
Finished page # : 0
Basic Quality Edit
Job Build - Step1
End
Insert page
Ready to Job build.
Place originals then press Start key.
Set
Metric specifications
Erase
Mode
Auto NoneOff
Modify
copy
Select
size orig.
NoneNone
Page
numbering
Margin/
Imag.shift
2-sided Copy-Left
Finished page #: 0
Basic Quality Edit
Job Build - Step1
End
Ready to Job build.
Set original. Press Start key.
Set
Insert
blank page
2
If you want the size of the originals to be detected
automatically, touch the “Auto” key. If you want to select a
standard original size, touch the key that corresponds to the
desired size.
If you want to select another standard original size, touch the
“Other stand. Size” [“Others stand. Size”] key and select the
desired size.
If you want to select the dimensions of the originals manually,
touch the “Input size” key and then set the corresponding
dimensions.
Inch specifications
Select original size
Select
size
Auto
Input size
User regist.
10 x 10"
9 x 9"
8 x 8"
12 x 12"
Ready to Job build.
Place originals then press Start key.
CloseBack
Set
8
1
/
2
x 14"
5
1
/
2
x
8
1
/
2
"
8
1
/
2
x
5
1
/
2
"
11 x 15"
A 4
A 4
11 x 17"
8
1
/
2
x 11"
11 x 8
1
/
2
"
Other
stand. Size
Metric specifications
Select size original
Select
size
Auto
Input size
Use regist.
215x400mm
215x400mm
215x400mm
215x400mm
Ready to Job build.
Set original. Press Start key.
CloseBack
Set
Folio
Others
stand. Size
3
Touch the “Close” key. The touch panel will return to the
screen in step 1.
