


Chapter 2: Basic Checkout
The Backup Battery
12 WORKABOUT PRO Hand-Held Computer With Windows CE 5.0 User Manual
2.1.2 The Backup Battery
To preserve dat a stor ed in your WORKABOUT PRO while you swap the main
battery, th e un it is equipped wit h a ba ckup ba tt ery
–a replace able, rechargeable
Lithium-Io n backup battery that can be orde red through Psion T ek logix. The backup
battery wi ll suppl y 5 minutes of co nti nuous power whi le you install a char ged,
main battery.
The backup bat tery is trickl e c harged fro m the mai n bat ter y. Provided that th e main
battery c onta ins power, the backup batte ry wi ll maint ain a charg e whet her t he
WORKABOUT PRO is switched on or o f f, in a do cking s tation or in a cra dle. Eve n
when the main bat tery reaches it s Suspend Threshold (refer to “Suspen d Thr eshold ”
on page 100) and the hand- held shuts down, the backup batt er y will cont in ue to
draw a t rickle cha r ge from the main batt ery to protect the data stored in the un it until
a charged main b att ery is inst all ed.
Note: The backup battery takes approximately 3 to 4 hours to fully charge from
a fully discharged (flat) state, generally the same amount of time it takes
to fully charge the main battery. While you can continue to use the
WORKABOUT PRO, replacing the main battery while the backup battery
is not fully charged is not recommended because you risk losing the data
stored on the unit.
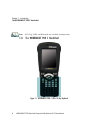
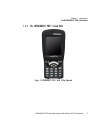
2.2 Turning The WORKABOUT PRO On And Off
2.2.1 Installing The Battery And Switching The Unit On
Important: Press [FN/BLUE] [ENTER] to turn off the hand-held before
opening the battery cover on your WORKABOUT PRO. When the
battery cover is removed, a power-off switch is automatically acti-
vated switching the unit off; if the battery cover is opened while
the hand-held is still powered on, the unit may reboot.
• To unlock the bat te ry cover, t urn the left-ha nd battery fast ener to t he l eft ,
and turn th e ri ght -hand battery fastener t o th e right.
• Remove the b att er y cover.
• Ensure that the ON/OFF switch i n the bat ter y compar tment is set to ON
before insertin g the battery.