


WORKABOUT PRO Hand-Held Computer With Windows CE 5.0 User Manual 49
Chapter 3: Getting To Know Your WORKABOUT PRO
Pairing A Bluetooth Headset Or Other Bluetooth Device
3.9.1 Pairing A Bluetooth Headset Or Other Bluetooth Device
Note: If the Bluetooth radio is not already enabled, tap on the Power icon in the
Control Panel, tap on the Devices tab and enable the Bluetooth radio.
To pair a h eadse t:
• Follow th e he adse t manuf act urer’s instruc tio ns t o place the hea dset you
want to place in pair ing mode.
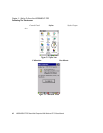
•In the Control Panel, tap on the Bluetooth icon c hoose the Devices tab and
Scan for devi ces in your ar ea. (Note t hat if y ou’r e pairi ng the devi ce for t he
first t ime, the device sca n occu rs a utomat ica lly; you do not need to t ap on
the Scan but ton t o per for m a sca n.)
When the sc an i s compl ete , a li st of de vic es i s li st ed.
• Double- cli ck on headset you want to pair wit h. If you prefer, you can high-
light headset and tap on t he Services button.
A dialog box ap pears request in g tha t you ente r a PIN number.
• Type your pin number and tap on OK.
A Services di al og box a ppears listing headset.
• Press and hol d the stylus on headset. In the pop-up menu, c hoose Active.
Your headset is now paired. A COM/BSP por t name wi ll now appe ar be sid e the
service f or t his devi ce. An asterisk will appear under the Active list in the Service
screen.
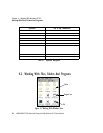
3.10 Inserting The SD/MMC Card And SIM Card
There are t wo slots available in the batt ery compartme nt – the lower slot is pr ovided
for a SD/MMC (Sec ure Digit al /Mult i- Med ia Car d) a nd th e upper slot is for a SIM
(Subscrib er Identity Mod ule) card.
SD/MMC cards pro vide addi ti onal non-volatile memory t o your hand-held. SIM
cards all ow access to t he han d -he ld Voice option, access the Int erne t, and so on.
3.10.1 Inserting The Card
• Switch off the WORKABOUT PRO.
• Remove the b att ery cover and t he b att ery.
A hinged door a t th e top of the ba tte ry c omp art ment pr ote cts the conne ctor s. I t i s
hinged on the lef t s ide .
• Pull the hi nged SD door down as t he ar row i con on t he door indic ate s.