


PRINTING WITH THE 4213
— If the default font was selected at the Main Menu, you
may turn the printer off and remove the cartridge for
storage. If you install the same cartridge before turning
the printer back on the selected default is still in place.
— Do not remove or insert cartridges while the printer is
switched on.
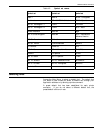
Selecting a default font
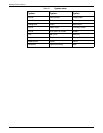
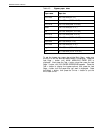
The font status sheet shows every font available for use as a
default font for the current emulation. Sample font status sheets
are shown on figures 4-3 and 4-4. The status sheet can include a
listing from all of the internal fonts, from installed font cartridges,
and any downloaded fonts.
Note: The LJ2D font status sheet identifies the font as either a
proportional or fixed-pitch (width) font. When printing in the
LJ2D mode, select a font width that matches the type of spacing
(fixed or proportional) that your application programme supports.
Use the Font Status Sheet to identify the number of the font you
wish to select as the default font.
Note: The font numbers are assigned by the printer. These font
numbers may change each time a different font cartridge is
installed, fonts are downloaded, or a different symbol set is
selected.
Choosing a new default font
To chose a new default font, make sure the display reads
EMULATION/XES* OR EMULATION/LJ2D*. Press the Test B
button to display the choices for the current emulation, e.g.
XES/COPIES. Now press the Last Page C button until XES/FONT
SELECT 003 or LJ2D/FONT NUMBER 001 appears. Nest press the
Select D button before you begin the font entry number. The
display reads, e.g. LJ2D/FONT NUMBER 001. The highlighted
number represents the first position of the 3-digit number
allowed for font identification. When the number is highlighted,
its value can be changed..
• Use the Menu A button to increase the value of the
highlighted number by one.
• Use the Test B button to decrease the value of the
highlighted number by one.
XEROX 4213 LASER PRINTER USER GUIDE 4-17