


XEROX COAX/TWINAX OPTION
Follow steps 1 to 8 for “Printing a Twinax configuration sheet”
and proceed from here:
The display reads:
IBM UTILITIES
PRINT CONFIG
C 9. Press the Last Page button until the display reads:
IBM UTILITIES
DATA MONITOR
B 10. Press the Test button to display the available data monitoring
options. The display reads:
DATA MONITOR
NONE*
C 11. Press the Last Page button. The display reads:
DATA MONITOR
HEX DUMP
D 12. Press the Select button to select the HEX dump option.
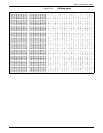
H 13. Press the Online button to put the printer back online. Files
which are now sent to the printer will print in the format
shown on figure A3-24.
A3-76 XEROX 4213 LASER PRINTER USER GUIDE