


XEROX COAX/TWINAX OPTION
Coax/Twinax board installation
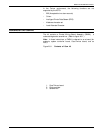
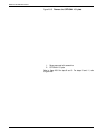
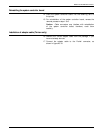
Figure A3-6. Coax/Twinax board
1. Connector
2. Coax/Twinax board
8. Remove the Coax/Twinax board from its packaging, if you
have not already done so.
9. Locate the connector on the Coax/Twinax board.
XEROX 4213 LASER PRINTER USER GUIDE A3-11