


SIMM KIT INSTALLATION AND REMOVAL INSTRUCTIONS
11. Check to make sure the SIMM board is securely held by the
locking tabs.
• If the board tilts easily back to the 30° angle, repeat
steps 2 to 5.
• If the board does not move, continue with step 12.
12. To install remaining boards, repeat steps 7 to 11.
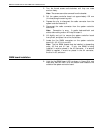
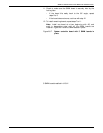
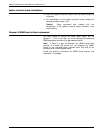
Note: Install one board at a time, beginning with J15, and
work in descending order until all the SIMM boards are
installed. Figure A5-7 shows 5 SIMM boards in place.
Figure A5-7. System controller board with 5 SIMM boards in
place
5 SIMM boards installed in J15-J11
4213 LASER PRINTER USER GUIDE A5-7