


Viewing and Configuring MAPs 273
Viewing the
Configured MAPs
To view the configured MAPs:
1 Select the Configuration tool bar option.
2 In the Organizer panel, click the plus sign next to the WX switch.
3 Click the plus sign next to Wireless.
4 Select Access Points.
The MAPs that are configured on the WX switch appear in the Content
panel. The radio settings appear in the Content panel. Each row in the
table shows settings for an individual MAP.
To display all settings for a MAP, select the MAP and click Properties.
Creating a
Distributed MAP
A MAP can connect to the wired network through a direct 10/100
Ethernet connection to a WX or indirectly through other Layer 2 or
Layer 3 wired networking devices. Configure a Distributed MAP for each
indirectly connected MAP.
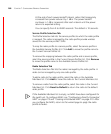
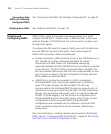
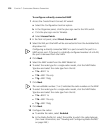
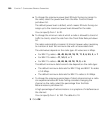
Table 20 lists how many MAPs you can configure on a WX switch, and
how many MAPs a switch can boot. The numbers are for directly
connected and Distributed MAPs combined.
For a MAP that is directly connected to the WX, configure a MAP port
instead. (For information, see “Configuring a Directly Connected MAP”
on page 275.)
To create a distributed MAP
1 Access the Create Distributed AP wizard:
a Select the Configuration tool bar option.
b In the Organizer panel, click the plus sign next to the WX switch.
c Click the plus sign next to Wireless.
Table 20 Maximum MAPs Supported Per Switch
WX Switch Model Maximum Configured Maximum Booted
WX4400 300 40, 80, or 120, depending on
the license.
WX1200 30 12
WXR100 8 3