


6-37
Calibrating for Increased Measurement Accuracy
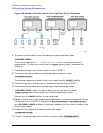
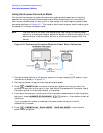
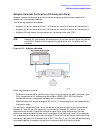
Power Meter Measurement Calibration
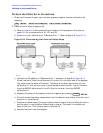
3. Select the analyzer as the system controller:
4. Set the power meter’s address (“XX” represents the address in the following keystrokes:
5. Select the appropriate power meter by pressing until the correct
model number is displayed (436A or 438A/437).
NOTE The E4418B and E4419B power meters have a “437 emulation” mode. This
allows these power meters, with an HP/Agilent 848X-series power sensor, to
be used with the network analyzer. In this step, when selecting a power
meter, choose the 438A/437 selection.
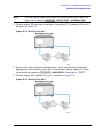
6. Set test port power to the approximate desired corrected power.
7. Press and enter the test port power level that you want at the
input to your test device. For example, if you enter , the display will read CAL
POWER −10.
8. If you want the analyzer to make more than one power measurement at each frequency
data point, press:
, (where n = the number of desired iterations).
If you increase the number of readings, the power meter correction time will
substantially increase.
9. Press .
NOTE Because power meter calibration requires a longer sweep time, you may want
to reduce the number of points before pressing . After the
power meter calibration is finished, return the number of points to its original
value and the analyzer will automatically interpolate this calibration. Some
accuracy will be lost for the interpolated points.
The analyzer will use the data table for subsequent sweeps to correct the output power
level at each measurement point. Also, the status annunciator PC will appear on the
analyzer display.
NOTE You can abort the calibration sweep by pressing .
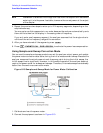
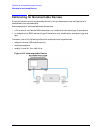
10.Remove the power sensor from the analyzer test port and connect your test device.
Local
SYSTEM CONTROLLER
SET ADDRESSES
ADDRESS: P MTR/GPIB
XX
x1
POWER MTR [ ]
Cal
PWRMTR CAL
−10 x1
NUMBER OF READINGS
n x1
Cal
PWRMTR CAL
ONE SWEEP
TAKE CAL SWEEP
TAKE CAL SWEEP
PWRMTR CAL OFF