


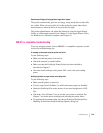


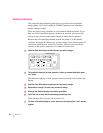


Density control panel
The printer has been adjusted at the factory to produce the best possible
image quality. All Color LaserWriter 12/600 PS printers come with these
default settings in effect.
There are always small variations in color between different printers. If you
have two Color LaserWriter printers on the same network, you can use the
density control panel to make subtle changes to match the two printers.
Because the color-matching methods assume the printer is in the default
condition, changing the settings may produce images of an inferior quality. If
you want to perform your own color correction, however, you can use the
controls on the panel to adjust the color balance of each color.
1Press the Color Select button to select the color you want to change.
2 To increase the density of the color, press the + button; to decrease the density, press
the – button.
The indicators light up to show progress toward increased or decreased color
density.
3Press the Color Select button to select the color you want to change.
4 Repeat steps 1 through 3 for each color you want to change.
5When you are finished changing color density, press Enter.
6Press Test Print to verify that the new settings are what you want.
These changes affect all print jobs from now on.
7 To return to the default setting for a color, select the color and press the + and – buttons
together.
M
CYBk
COLOR
SELECT
DEFAULT ENTER
TEST
PRINT
254
Chapter 13