


4-22
ENG
VALVES AND VALVE SPRINGS
NOTE:
CAUTION:
EAS00240
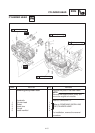
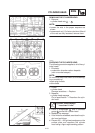
CHECKING THE VALVE SEATS
The following procedure applies to all of the
valves and valve seats.
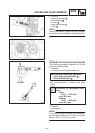
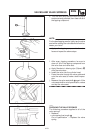
1. Eliminate:
Scarbon deposits
(from the valve face and valve seat)
2. Check:
Svalve seat
Pitting/wear ! Replace the cylinder head.
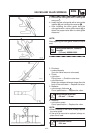
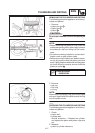
3. Measure:
Svalve seat width
a
Out of specification ! Replace the cylinder
head.
Valve seat width
Intake: 0.9 X 1.1 mm
Exhaust: 0.9 X 1.1 mm
a. Apply Mechanic’s blueing dye (Dykem)
b
onto the valve face.
b. Install the valve into the cylinder head.
c. Press the valve through the valve guide and
onto the valve seat to make a clear pattern.
d. Measure the valve seat width. Where the
valve seat and valve face contacted one
another, the blueing will have been removed.
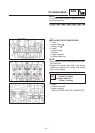
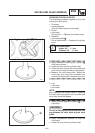
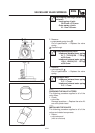
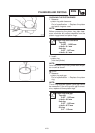
4. Lap:
Svalve face
Svalve seat
After replacing the cylinder head or replacing
the valve and valve guide, the valve seat and
valve face should be lapped.
a. Apply a coarse lapping compound
a
to the
valve face.
Do not let the lapping compound enter the
gap between the valve stem and the valve
guide.
b. Apply molybdenum disulfide oil onto the
valve stem.
c. Install the valve into the cylinder head.