


Chapter 17: Basic Switch Parameters
208 Section II: Web Browser Interface
Enabling and Disabling the DHCP Client
This procedure explains how to activate and deactivate the DHCP client
on the switch. When the client is activated, the switch obtains its IP
configuration, such as its IP address and subnet mask, from a DHCP
server on your network. Before performing the procedure, note the
following:
An IP address and subnet mask are not required for normal network
operations of the switch. Values for these parameters are only required
if you want to remotely manage the device with a web browser.
A gateway address is only required if you want to remotely manage
the device from a remote management station that is separated from
the switch by a router.
The DHCP client is disabled by default on the switch.
The DHCP client does not support BOOTP.
You must assign an IP address initially through a local management
session using the menus interface.
To activate or deactivate the DHCP client on the switch, perform the
following procedure:
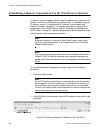
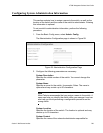
1. From the Basic Config menu, select IP Config.
The IP Configuration page is shown in Figure 58 on page 206.
2. For the DHCP Mode, select Enable or Disable.
3. Click Apply.
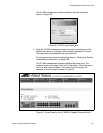
When you enable DHCP, the switch immediately begins to send
queries to the DHCP server. It continues to send queries until it
receives a response with its new IP address.
Note
Enabling DHCP ends your web browser management session. To
resume managing the switch, use a local connection and the menus
interface to view the IP address assigned by the DHCP server.
Then, enter that address in a web browser’s URL field.