


Chapter 6: Port Trunking
92 Section I: Using the Menus Interface
Setting Up an LACP Trunk
This section contains the following procedures to work with LACP trunks:
“Creating an LACP Trunk,” next
“Configuring the LACP Port Priority” on page 93
“Verifying the LACP Group Settings” on page 94
“Disabling an LACP Trunk” on page 95
Creating an
LACP Trunk
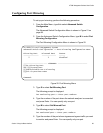
To create an LACP trunk, perform the following procedure:
1. From the Main Menu, type A to select Advanced Switch
Configuration.
The Advanced Switch Configuration Menu is shown in Figure 21 on
page 88.
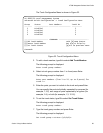
2. From the Advanced Switch Configuration Menu, type T to select
Trunk Configuration.
The Trunk Configuration Menu is shown in Figure 22 on page 89.
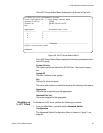
3. To set the trunk status, type S to select Set Trunk Status.
The following prompt is displayed:
Enter trunk group number>
4. Type the trunk group number and press Enter.
The following prompt is displayed:
Set trunk group
n
status (A/P/M/D)>
5. Choose one of the four following settings:
A - LACP Active: Ports are in an active negotiation state.
P - LACP Passive: Ports are in a passive state where the port
negotiates a bundle by exchanging LACP packets to the peer only if
the far end initiates it.
M - Manual: Ports are in a static trunk state.
D - Disabled: Ports are disabled and do not sent or received LACP
data units or network traffic.
Note
LACP must be enabled at both ends of the link to be operational.